Quantcast
Channel: Embedded – Qt Blog
Viewing all 111 articles
Browse latest View live

Over-the-Air Updates, Part 3: Repository Configuration and Handling

$
0
0

Part one of the blog post series introduced the challenges of implementing an update system. We looked at the OSTree project and how it can help us to bring system update functionality to Qt for Device Creation. The second part demonstrated the tooling and the API that is provided by the Qt OTA Update module. We ended the second blog post by demonstrating how to generate an update. In this blog post we will export the generated update on a static HTTP server and configure a client device to query this server for system updates. Following this will be a short history lesson on OSTree adoption in the Linux ecosystem. But first we will take a quick look at what’s new in the Qt OTA Update module since the Technology Preview release.

Status Update.

Starting with Qt 5.8 for Device Creation, the Qt OTA Update module is graduating from being a Technology Preview module to a fully supported module. Some of the new features and improvements in Qt OTA Update 1.0 are: initramfs no longer being a hard requirement for using the OTA update feature (desirable when optimizing boot time), new API for configuring how remote OSTree repositories are accessed, more status notifications from the update process for the convenience of users, some minor API renamings, improved demo application and new command line arguments for the qt-ostree tool (for fine-tuning the image and update generation).

Exporting Repository.

As mentioned earlier, we ended the second blog post by generating a new update. An update (or a system snapshot) is a commit into OSTree repository. By default, qt-ostree stores this repository in WORKDIR/ostree-repo/. For local testing you can pass --start-trivial-httpd to qt-ostree. This starts a simple HTTP server which is accessible on the local host at the address specified in the WORKDIR/httpd/httpd-address file. In a real world scenario you would want to export this repository on a production server. This is as simple as copying the contents of the WORKDIR/ostree-repo/ directory to a dedicated path on the server.

The --start-trivial-http does not have support for HTTPS so I have configured my own Apache web server. This server requires TLS client side authentication. A URL to the OSTree repository in my case is https://www.b2qtupdate.com/ostree-repo. Because the configured web server resides on my development machine, the ostree-repo/ directory from the URL is conveniently a symlink to WORKDIR/ostree-repo/. Whenever I generate a new system snapshot, it is immediately available on https://www.b2qtupdate.com/ostree-repo. The next step is to point client devices to this address.

Configuring Devices.

Extending on the demo from the previous blog post, we need to add a configuration that describes how to access the server:

OtaRepositoryConfig {
    id: secureConfig
    gpgVerify: true
    url: "https://www.b2qtupdate.com/ostree-repo"
    tlsClientCertPath: "/usr/share/ostree/certs/clientcert.pem"
    tlsClientKeyPath: "/usr/share/ostree/certs/clientkey.pem"
    tlsPermissive: false
    tlsCaPath: "/usr/share/ostree/certs/servercert.pem"
}

Here we are pointing the client device to the URL where we exported the generated OSTree repository. This configuration requires the update to be signed by a known GPG key. We also provide paths to the certificate files (on the device) which are used for client and server TLS authentication. A keyring with the trusted keys and certificate pinning should be done when creating the initial image (during the device integration step). The current configuration can be updated by calling:

OtaClient.setRepositoryConfig(OtaRepositoryConfig config)

The subsequent calls to the server (for example, fetching metadata about the remote snapshot) will use this updated configuration.

An alternative configuration could use unencrypted HTTP and look as follows:

OtaRepositoryConfig {
    id: basicConfig
    url: "http://www.b2qtupdate.com/ostree-repo"
}

If we exported the repository to scheme://host:port/my-product/system-updates/, we would point devices to that URL instead. The complete demo application is available here.

OSTree Adoption.

System updates are an everlasting area of interest. Just look at the talks dedicated to this topic on the Embedded Linux Conference this year (and the years before). OSTree was amongst the presented alternatives, receiving great feedback due to its outstanding approach. OSTree originated as a research venture in high speed continuous delivery and testing infrastructure for GNOME. It has been a well-received technology with expanding adoption in the Linux ecosystem. OSTree is being used at the core of new Linux distributions – Project Atomic, Endless OS, Papyros. Automotive Grade Linux is researching OSTree integration for the AGL reference platform. Flatpak (a framework for distributing Linux applications) is another interesting project that uses OSTree to distribute and manage applications and runtimes. As we can see, OSTree is hot technology, being adopted by a variety of projects on desktop, servers and embedded systems.

Want to have a robust and modern update system on your devices as well? The Qt OTA Update 1.0 module brings full OSTree support with convenient Qt APIs to Qt 5.8 for Device Creation.

Conclusion.

This concludes the series of the blog posts introducing the Qt OTA Update module. Try it yourself with Qt for Device Creation and let us know what you think. Feedback and feature requests are always welcome and appreciated.

The post Over-the-Air Updates, Part 3: Repository Configuration and Handling appeared first on Qt Blog.


Embedded Devices with Qt and the INTEGRITY RTOS

$
0
0

The Green Hills INTEGRITY Real-Time Operating System (RTOS) is widely used in safety- and security-critical systems. Work has been ongoing for already some time to get Qt 5 running on INTEGRITY, and now we are delighted to show a proof-of-concept port of Qt 5.7 on top of INTEGRITY.

Qt 4.8 support has been available for a long time on the INTEGRITY RTOS. We are now pleased to announce that a proof-of-concept port of Qt 5.7 to INTEGRITY has been completed by Green Hills engineers. During the work, we tested the port on all major embedded HW platforms, including ones that have OpenGL ES support available. Work continues together with The Qt Company and the Qt ecosystem and thanks to this initial prototype, the upcoming Qt 5.9 is expected to contain INTEGRITY support.

In the automotive space where both Qt and the INTEGRITY RTOS are already present, this allows for additional synergies where Qt can be used in conjunction with INTEGRITY on both infotainment systems as well as instrument clusters. Especially in automotive instrument clusters as well as in other safety critical systems the certified RTOS is a vital building block.

In the prototype Qt integration we built all the basic libraries one expects: Core, Network, Gui, Svg, XmlPatterns, ImageFormats, Widgets. Applications can also take advantage of the more modern part of the framework, including Qt Quick 2, Qt Quick Controls 2, and Qt 3D.

The following video presents a Qt cluster running on the proof-of-concept port of Qt 5.7 on INTEGRITY 11.4.4 on NXP i.MX6.

The proof-of-concept port has been so far been used on NXP i.MX6, Intel Apollo Lake, TI Sitara and Jacinto 6. Other platforms like Renesas R-Car H3 are expected to come very soon too. We are also strongly cooperating with partners from the Qt ecosystem who can help customers get to production faster with the integrated solution.

The post Embedded Devices with Qt and the INTEGRITY RTOS appeared first on Qt Blog.

Which OpenGL implementation is my Qt Quick app using today?

$
0
0

Qt Quick-based user interfaces have traditionally been requiring OpenGL, quite unsurprisingly, since the foundation of it all, the Qt Quick 2 scenegraph, is designed exclusively with OpenGL ES 2.0 (the top of the line for mobile/embedded at the time) in mind. As you may have heard, the graphics API story is a bit more inclusive in recent Qt versions, however the default OpenGL-based rendering path is, and is going to be, the number one choice for many applications and devices in the future. This raises the interesting question of OpenGL implementations.

Wait, there is more than one? Isn’t there one for my graphics card, and that’s it?

Kind of, but not quite.

The vendor-provided OpenGL implementation is one thing, but is is not always there to begin with (anyone who attempted to deploy Quick apps on a wide range of older machines running e.g. Windows 7 with no graphics driver installed could likely talk a lot about this…), while in some cases there are alternative options, for instance an open-source stack like Mesa. Some of these stacks can then provide multiple ways of operation (think software rasterizers like Mesa llvmpipe or Direct3D WARP).

As an example, let’s take a look at Windows. The Windows-specific area of the Qt documentation describes the options pretty well. To summarize, one may be using OpenGL proper (a vendor-provided ICD behind opengl32.dll), ANGLE in D3D9 mode, ANGLE in D3D11 mode, ANGLE with the D3D11 WARP software rasterizer, an OpenGL software rasterizer provided by Mesa llvmpipe. That is no fewer than 5 options, and the choice can be made based on the built-in GPU card/driver blacklist or environment variables or hard-coded application preferences. All this is not exactly rocket science, but it does require a certain level of awareness from the developer during development, possibly when reporting bugs and support requests, and naturally also when planning deployment.

Why does this matter?

  • It is not always obvious what is going on. Just starting a Qt Quick application and getting some output does not mean rendering is happening on the optimal path. When the application does not render at the expected speed, the very first thing to verify is if the graphics stack is the expected one. There can always be an unexpected environment variable or blacklist rule present, or the application may pick the wrong graphics stack when there are multiple ones present in the system.
  • Some of the options come with a set of drawbacks and affect the runtime behavior (most importantly, the choice of the Qt Quick render loop used behind the scenes), which in turn can affect performance and can even disable features. (No threaded render loop? No render thread Animators for you.)
  • When reporting issues to the Qt Project bug tracker or Qt Support, it is essential to provide the necessary information about the runtime environment. A mere “OpenGL on Windows” or “Qt Quick on an ARM device” is never sufficient.

QSG_INFO=1 is your friend

When in doubt about graphics performance or before attempting to troubleshoot any sort of graphics issues, do set the QSG_INFO environment variable to 1 and rerun your Qt Quick application.

An alternative in modern Qt versions is to enable the qt.scenegraph.general logging category.

This will print something like the following either on the console or the debug output: (on Windows you can use DebugView for non-console apps when not launching from Qt Creator)

qt.scenegraph.general: threaded render loop
qt.scenegraph.general: Using sg animation driver
qt.scenegraph.general: Animation Driver: using vsync: 16.95 ms
qt.scenegraph.general: texture atlas dimensions: 2048x2048
qt.scenegraph.general: R/G/B/A Buffers:    8 8 8 0
qt.scenegraph.general: Depth Buffer:       24
qt.scenegraph.general: Stencil Buffer:     8
qt.scenegraph.general: Samples:            0
qt.scenegraph.general: GL_VENDOR:          NVIDIA Corporation
qt.scenegraph.general: GL_RENDERER:        GP10B (nvgpu)/integrated
qt.scenegraph.general: GL_VERSION:         OpenGL ES 3.2 NVIDIA 367.00
qt.scenegraph.general: GL_EXTENSIONS:      ...
qt.scenegraph.general: Max Texture Size:  32768
qt.scenegraph.general: Debug context:     false

What does this tell us?

The OpenGL vendor, renderer and version strings. In the example above we see Qt Quick is using an OpenGL ES 3.2 context on some NVIDIA embedded platform, using the vendor’s driver. This look good.

Now, if there happen to be references to llvmpipe, like in the below example, then that should immediately raise a flag: your application is rendering via a software rasterizer. If this is expected, fine. If not, then you should figure out why, because performance is seriously affected (you are not using the GPU at all).

GL_VENDOR: VMware, Inc.
GL_RENDERER: Gallium 0.4 on llvmpipe (LLVM 3.6, 128 bits)
GL_VERSION: 3.0 Mesa 11.2.2

Let’s take another example, this time with ANGLE. Here I just forced the usage of ANGLE by setting QT_OPENGL=angle on an otherwise fully OpenGL capable system:

qt.scenegraph.general: windows render loop
qt.scenegraph.general: Using sg animation driver
t.scenegraph.general: Animation Driver: using vsync: 16.67 ms
qt.scenegraph.general: texture atlas dimensions: 512x512
qt.scenegraph.general: R/G/B/A Buffers:    8 8 8 8
qt.scenegraph.general: Depth Buffer:       24
qt.scenegraph.general: Stencil Buffer:     8
qt.scenegraph.general: Samples:            0
qt.scenegraph.general: GL_VENDOR:          Google Inc.
qt.scenegraph.general: GL_RENDERER:        ANGLE (NVIDIA GeForce GTX 960 Direct3D11 vs_5_0 ps_5_0)
qt.scenegraph.general: GL_VERSION:         OpenGL ES 2.0 (ANGLE 2.1.0.8613f4946861)
qt.scenegraph.general: GL_EXTENSIONS:      ...
qt.scenegraph.general: Max Texture Size:  16384
qt.scenegraph.general: Debug context:     false

The key points are that (1) we are using ANGLE, (2) it is using its D3D11 backend, and (3) the Qt Quick scenegraph is using the (somewhat ill-named) ‘windows’ render loop, meaning no dedicated render thread is present. The usage of D3D9 or D3D11 WARP can be recognized from the renderer string in the same way.

Then there is the Qt Quick scenegraph’s active render loop. This can be threaded, basic or windows. In recent Qt versions the scenegraph documentation describes all of these quite well, including the logic for choosing the loop to use. For experimenting or troubleshooting one can always override by setting the environment variable QSG_RENDER_LOOP to one of the three render loop names.

One common problem, mainly on embedded systems, is sometimes the bizarre speed up of animations. If you find that QML animations are running a lot faster than they should be and that the threaded render loop is in use, there is a good chance the issue is caused by the missing or incorrect vertical sync throttling. Solving this will be platform specific (e.g. in some cases one will need to force making a dedicated FBIO_WAITFORVSYNC ioctl, see QT_QPA_EGLFS_FORCEVSYNC), but armed with the logs from the application at least the root cause can be uncovered quickly and painlessly. (NB as a temporary workaround one can force the basic render loop via QSG_RENDER_LOOP=basic; this will provide more or less correct timing regardless of vsync at the expense of losing smooth animation)

Your other friends: qtdiag and contextinfo

Note that the scenegraph’s log only provides limited system information. It is great for strictly graphics and Quick-related issues, but when making bug reports, especially for Windows, it is strongly recommended to post the output of the qtdiag utility as well. This will provide a lot wider set of system information.

Additionally, the contextinfo example in examples/opengl/contextinfo is a good tool to troubleshoot basic OpenGL bringup problems. Launch it normally, click Create Context, see what happens: does the triangle show up? Does it rotate smoothly? Are the vendor and renderer strings as expected? Then set QT_OPENGL=angle and re-run. Then set QT_ANGLE_PLATFORM=d3d9 and re-run. Then set QT_OPENGL=software and, assuming the opengl32sw.dll shipped with the pre-built Qt packages is accessible, re-run. Or on Linux with Mesa, set LIBGL_ALWAYS_SOFTWARE=1 and see what happens. And so on.

Why am I not getting the right GL implementation?

Now, let’s say the logs reveal we are stuck with a software rasterizer and our beautiful Qt Quick UI runs sluggishly in a maximized full HD window. What can we do to figure out why?

On Windows, enable the logging category qt.qpa.gl. (e.g. set QT_LOGGING_RULES=qt.qpa.gl=true) This will tell why exactly the OpenGL implementation in question was chosen. The typical reasons are:

  • opengl32.dll not providing OpenGL 2.0
  • the card PCI ID or driver vendor/version matching a built-in GPU blacklist rule
  • having the QT_OPENGL or QT_ANGLE_PLATFORM environment variables set
  • having a hard-coded request like Qt::AA_UseSoftwareOpenGL via QCoreApplication::setAttribute().

On Linux, there are typically three reasons:

  • With Mesa, the environment variable LIBGL_ALWAYS_SOFTWARE forces a software rasterizer. Check if it is set, and if it is, investigate why.
  • In some environments no hardware acceleration is available. In some virtual machines for example, you will be stuck with a Mesa llvmpipe based rendering path.
  • Multiple graphics stacks. This can happen on any kind of Linux systems, but is more likely to happen on some embedded device oriented distros. Running ldd on the application and the relevant Qt libraries, and looking for libGLESv2.so may help to figure out what is going on.

A cautionary tale

The Raspberry Pi has at least three OpenGL solutions as of today: the Broadcom graphics stack, Mesa with llvmpipe (software rasterizer), and the upcoming Mesa with proper GPU acceleration (VC4) path.

Unfortunately this can lead to an unholy mess due to some distros prefering to ship Mesa llvmpipe in order to provide some sort of OpenGL under X11 (which the Broadcom stack does not support): Qt applications may unexpectedly pick up Mesa when they should use Broadcom (for Dispmanx without X11), while they may end up with disastrous performance under X11 due to overdriving the poor CPU with software GL rasterization.

While it is easy to blame Qt, JavaScript VMs, scripting languages, C++, and everything but the kitchen sink when one’s Quick application runs slowly, the solution to figure out the root cause is often even easier: QSG_INFO=1.

That’s all for now. Take care, and make sure to check the output from QSG_INFO=1 next time.

The post Which OpenGL implementation is my Qt Quick app using today? appeared first on Qt Blog.

Boot to Qt on embedded HW using Android 7.0 and Qt 5.8

$
0
0

One can have real pain trying to create a demo setup or proof-of-concept for an embedded device. To ease the pain Qt for Device Creation has a list of supported devices where you can flash a “Boot to Qt” image and get your software running on the target HW literally within minutes.

Background

Back in 2014 we introduced a way to make an Android device boot to Qt without the need of a custom OS build. Android has been ported to several devices and the Android injection method made it possible to get all the benefits of native Qt applications on an embedded device with the adaptation already provided by Android.

The Android injection was introduced using Qt versions 5.3.1. whereas the supported Android versions were 4.2 and 4.4. It is not in our best interest that anyone would be forced to use older version of Qt, nor does it help if the Android version we support does not support the hardware that the developers are planning to use. I have good news as the situation has now changed.

Late last year we realized that there still is demand for Android injection on embedded devices so we checked what it takes to bring the support up to date. The target was to use Qt 5.8 to build Boot to Qt demo application and run it on a device that runs Android 7.0. The device of choice was Nexus 6 smartphone which was one of the supported devices for Android Open Source Project version 7.0.0.

The process

We first took the Android 7.0 toolchain and updated the Qt 5.4 Boot to Qt Android injection source code to match the updated APIs of Android 7.0. Once we could build Qt 5.4 with the toolchain, it was time to patch the changes all the way to Qt 5.8.
Since Qt version 5.4 there has been improved modularity in Qt and it became apparent during the process, e.g. the old Surfaceflinger integration was replaced with a platform plugin.

The results can be seen in the videos below.

The Boot to Qt Android injection is an excellent way to speed up the development and get your software to run on target hardware as early as possible. If you want to know more about the Boot to Qt and Android injection, don’t hesitate to contact us.

The post Boot to Qt on embedded HW using Android 7.0 and Qt 5.8 appeared first on Qt Blog.

Getting more out of Qt Quick with OpenVG

$
0
0

In Qt 5.9 is now possible to render Qt Quick applications with OpenVG when using hardware that supports it. This is made possible by a new scene graph adaptation that uses EGL and OpenVG to render Qt Quick scenes.  When using Qt for Device Creation, it means that it now be possible to run with graphics hardware acceleration on some devices where today only software rendering is available.

OpenVG Logo

So what is OpenVG (or if you already know: Seriously… OpenVG?)

OpenVG is an API for hardware accelerated 2D vector graphics.  The API exposes the ability to draw and shade paths and images in an accelerated manner.  The OpenVG 1.1 standard was developed by the Khronos Group and is implemented by vector GPU vendors.  The reason for the tone of sarcasm in my sub-heading and why I am sure there will be more than a few readers eye-rolling is that OpenVG has been around for quite some time.  The latest update of the OpenVG 1.1 standard was released in 2008. In addition the Khronos working group for OpenVG has since disbanded likely meaning there will not be any further updates.

This is also not the first time that Qt has supported OpenVG in one way or another.  In Qt 4 there was an OpenGL paint engine that enabled QPainter commands to be rendered using the OpenVG API. I do not wish to revive that code, but rather choose to limit usage of the OpenVG API to a smaller subset to accelerate the rendering of Qt Quick applications.

So why OpenVG now?

Qt runs on many embedded devices, but to get the most benefit out of Qt Quick has so far required at least OpenGL 2.0 support. At the same time customers want to use Qt Quick on their low-end embedded devices lacking OpenGL-capable GPUs.  So first we introduced the Software adaptation, previously known as the Qt Quick 2D Renderer. See our previous posts here and here. There is however an in-between where hardware has a GPU supporting OpenVG 1.1 but not OpenGL 2.0.  OpenVG is a good match for accelerating the rendering of Qt Quick because most features can be enabled, leading to better performance on hardware that has OpenVG-capable GPU.

A few examples of system-on-chips with this configuration are the NXP iMX6 SoloLite, and Vybrid VF5xxR chips which both use the GC355 Vector GPUs enabling OpenVG.  The OpenVG working group may no longer be actively working on the standard itself, but SoC vendors are still releasing on hardware that supports OpenVG.

How does it perform?

The expected behavior for the OpenVG adaptation is that it fills the space between OpenGL and Software rendering.  With hardware that supports both OpenGL and OpenVG, expect the OpenGL renderer to outperform OpenVG as OpenGL gives more opportunities for optimisation.  If you test the OpenVG adaptation on a Raspberry Pi you will see that default OpenGL renderer will do significantly more before dropping below 60 FPS.

How can I make use of the OpenVG adaptation?

To use the OpenVG backend you will need to build Qt with support for it.  In Qt 5.9 we have re-added a test for OpenVG support which will enable the feature in Qt Quick.  Once you have a suitable build of Qt deployed to your target device you will need to run your application with a platform plugin that supports EGL (EGLFS or MinimalEGL).  Then if you set the environment variable QT_QUICK_BACKEND=openvg your Qt Quick applications will create OpenVG capable EGL surfaces, and render using OpenVG commands. For more information, see the scenegraph adaptation section at the snapshot documentation site.

Limitations

Like the Software adaptation, the OpenVG adaptation comes with some limitations due to the lack of 3D and Shader Effects.  It is not possible to use QML components that depend on OpenGL or Shader Effects directly. That means that Qt Quick modules like Particles and Graphical Effects are not available.  If your application works with the Software adaption, it will work better with the OpenVG backend with hardware capable of using it.

The EGLFS platform plugin also introduces some limitations.  When using EGLFS platform with Qt for Device Creation you may have become accustom to having a mouse cursor and support for multiple child windows.  Despite the platform plugins name (EGL Fullscreen) it is a bit naughty and does use OpenGL for a few things. Specifically composing multiple windows and the mouse cursor.  If you use EGLFS on a platform without OpenGL though, these features are not available.  In a shipping device this usually isn’t an issue.  It can be annoying if you don’t expect it during the development phase.  Funny enough we had a very similar limitation with the OpenVG paint engine in Qt 4 with QWS.

Conclusions

In the embedded space there is a need to make use of any available resources. This adaptation is just one more way that Qt is helping fill that need.  I hope that this adaptation will make some of your device creation efforts easier so that you can spend more time making cool products with Qt.  Thanks for reading and keep on hacking.

The post Getting more out of Qt Quick with OpenVG appeared first on Qt Blog.

Qt from git on the Tinkerboard (with Wayland)

$
0
0

The Asus Tinkerboard is a nice little board for Embedded Linux (or Android, for that matter), based on the Rockchip RK3288 SoC including a quad-core ARM Cortex-A17 CPU and a Mali-T760 MP4 (T764) GPU. Besides being quite powerful, it has the advantage of being available locally in many countries, avoiding the need to import the boards from somewhere else. It has its own spin of Debian, TinkerOS, which is what we are going to use here. This is not the only available OS/distro choice, check for example the forums for other options.

We are going to set up the latest qtbase and qtdeclarative from the dev branch, and, to make things more interesting, we are going to ignore X11 and focus on running Qt applications via eglfs with the DRM/KMS backend. This is fairly new for Qt on Mali-based systems: in the past (for example, on the ODROID-XU3) we have been using the fbdev-based EGL implementation. Additionally, Wayland, including Qt-based compositors, is functional as well.

tinkerboard_1

First Things First

qtbase/dev recently received a patch with a simple device spec for the Tinkerboard. Make sure this is part of the checkout of the qtbase tree you are going to build.

As usual, we are going to cross-compile. The steps are pretty similar to the Raspbian guide in the Wiki. I have been using this TinkerOS 1.8 image as the rootfs. To get a suitable ARM (32-bit) cross-compiler for x64, try this Linaro toolchain.

When it comes to the userspace graphics drivers, I have been using the latest “wayland” variant from the Firefly RK3288 section at the Mali driver page. Now, the TinkerOS image does actually come with some version/variant of the binary drivers in it so this step may or may not be necessary. In any case, to upgrade to this latest release, get malit76xr12p004rel0linux1waylandtar.gz and copy the EGL/GLES/GBM/wayland-egl libraries to /usr/lib/arm-linux-gnueabihf. Watch out to have all symlinks adjusted.

As the final preparation step, let’s disable auto-starting X: systemctl set-default multi-user.target.

Sysroot, Configure, Build

From this point on, the steps to create a sysroot on the host machine and to build qtbase against it are almost completely the same as in the earlier Wiki guides for the RPi. Feel free to skip reading this section if it all looks familiar already.

  • Install some development headers and libraries on the target: sudo apt-get build-dep qt4-x11 libqt5gui5 wayland weston.
  • Create a sysroot on the host:
    mkdir -p ~/tinker/sysroot/usr
    rsync -e ssh avz linaro@...:/lib ~/tinker/sysroot
    rsync -e ssh avz linaro@...:/usr/include ~/tinker/sysroot/usr
    rsync -e ssh avz linaro@...:/usr/lib ~/tinker/sysroot/usr
    

    (NB. this is a massive overkill due to copying plenty of unnecessary stuff from /usr/lib, but will do for now)

  • Make all symlinks relative:
    cd ~/tinker
    wget https://raw.githubusercontent.com/riscv/riscv-poky/master/scripts/sysroot-relativelinks.py
    chmod +x sysroot-relativelinks.py
    ./sysroot-relativelinks.py sysroot
    
  • Configure with -device linux-tinkerboard-g++:
    ./configure -release -opengl es2 -nomake examples -nomake tests -opensource -confirm-license -v \
    -device tinkerboard -device-option CROSS_COMPILE=~/tinker/toolchain/bin/arm-linux-gnueabihf- \
    -sysroot ~/tinker/sysroot -prefix /usr/local/qt5 -extprefix ~/tinker/qt5 -hostprefix ~/tinker/qt5-host
    

    Adjust the paths as necessary. Here the destination on the target device will be /usr/local/qt5, the local installation will happen to ~/tinker/qt5 while the host tools (qmake, moc, etc.) go to ~/tinker/qt5-host.

  • Then do make and make install as usual.
  • Then rsync qt5 to /usr/local on the device.

Watch out for the output of configure. The expectation is something like the following, especially when it comes to EGLFS GBM:

EGL .................................... yes
  ...
  OpenGL:
    Desktop OpenGL ....................... no
    OpenGL ES 2.0 ........................ yes
    OpenGL ES 3.0 ........................ yes
  ...
Features used by QPA backends:
  evdev .................................. yes
  libinput ............................... yes
  ...
QPA backends:
  ...
  EGLFS .................................. yes
  EGLFS details:
    ...
    EGLFS GBM ............................ yes
    ...
  LinuxFB ................................ yes
  VNC .................................... yes
  ...

Action

Build and deploy additional Qt modules as necessary. At this point QWindow, QWidget and Qt Quick (QML) applications should all be able to run on the device.

Few notes:

  • Set LD_LIBRARY_PATH, if needed. If the Qt build that comes with the system is still there in /usr/lib/arm-linux-gnueabihf, this is pretty much required.
  • When using a mouse, keyboard or touchscreen, make sure the input devices have sufficient permissions.
  • Enable logging by doing export QT_LOGGING_RULES=qt.qpa.*=true.

As proven by the logs shown on startup, applications will use the eglfs_kms backend which is good since it gives us additional configurability as described in docs. The OpenGL ES implementation seems to provide version 3.2 which is excellent as well.

One thing to note is that the performance may suffer by default due to not running at high enough frequency. So if for instance the qopenglwidget example seems to get stuck at 20 FPS after startup, check this forum thread for examples on how to change this.

Wayland

Yes, QtWayland just works. Here is the minimal-qml compositor example with some clients:

tinkerboard_2

One thing to note is that the default egl_platform.h leads to a build failure in qtwayland. To circumvent this, add a cast to EGLNativeWindowType in the problematic eglCreateWindowSurface call.

That’s all for now, have fun with the Tinkerboard!

The post Qt from git on the Tinkerboard (with Wayland) appeared first on Qt Blog.

Functional Safety with the Qt Safe Renderer

$
0
0

I am pleased to announce a new approach for inclusion of functional safety critical user interface elements in Qt based systems. The new Qt Safe Renderer makes it easy to create safety critical systems that also have a rich graphical user interface. Industries such as automotive, medical and industrial automation, where Qt is the leading UI framework, can now satisfy safety critical requirements with Qt easier than before.

For those who are not yet familiar with our approach to functional safety please check the earlier blog post about functional safety and a blog post on how to create certified systems with Qt.

To create a certified system, the safety critical features must be separated from the other parts of the system. The safety critical functionality can be separated, for example, by running in own memory protected processes with a certified Real-Time Operating System (RTOS). This leaves two parts that need to be addressed in a safety critical system:

  • Certified tooling to produce the UI design workflow
  • Designing, writing and certifying the safety-critical code

The new Qt Safe Renderer solves both of these by providing tooling to design safety critical UI items and dedicated software to reliably render the these elements in a Qt based safety critical system.

The Qt Safe Renderer tooling makes it easy to add safety critical UI elements to Qt based safety critical systems. Adding safety critical UI elements, such as telltales or other indicators, is very simple using Qt’s drag-and-drop visual design tools. Qt even comes with a comprehensive set of ISO standard icons for warnings and other indicators, all readily accessible from the visual design tool. The visual design tool integration allows modifications to the safety critical UI elements without needing to change any of the certified software components.

Qt Safe Renderer Design Tool

Image 1: Adding safety critical visual elements to a Qt application is convenient with the provided visual design tools.

ISO Icon Browser

Image 2: Qt provides a wide selection of ISO standard warning and other icons and a convenient tool to use these in the Qt application.

After you have added the safety critical UI elements to the application, it is time to build. A new tool extracts the safety critical UI elements from the UI providing the layout and images of the safety critical parts to the safety certified renderer component. The tool also removes the safety critical parts from the main Qt UI. When the system is running, no matter what happens in the main UI, the safe rendering system ensures that the safety critical parts continue to operate uninterrupted.

safe_pic_3

Image 3: A digital instrument cluster leveraging Qt Safe Renderer can be certified according to ISO 26262 ASIL B.

With Qt and the Qt Safe Renderer it is possible to create many different kinds of certified systems. While our initial focus is on automotive digital cockpits this solution is also applicable to medical and industrial automation systems. ISO 26262, IEC 61508 or IEC 62304 are some of the applicable standards that we are working to certify the new Qt Safe Renderer for.

Qt Safe Renderer works with Qt 5.9 and Creator 4.3, or later versions. For the target RTOS we are supporting INTEGRITY and QNX. On the silicon side we are supporting the NXP iMX6 and NVIDIA Tegra X1 with plans to to add support for Qualcomm Snapdragon 820 and Renesas H3. We can support alternative RTOS and processors on an as needed basis.

The Qt Safe Renderer and related tooling will become available as an add-on to the commercially licensed Qt.

Contact us to learn more and discuss your safety related needs in more detail.

The post Functional Safety with the Qt Safe Renderer appeared first on Qt Blog.

What’s new in Qt 3D with Qt 5.9?

$
0
0

I am pleased to announce that there are lots of new goodies coming along with Qt 3D as part of the Qt 5.9.0 release as well as the usual round of bug fixes. Engineers from KDAB and The Qt Company have been hard at work over the last months (and will be for some time to come) adding in some of the most frequently requested features. In this article, we will give a brief overview of some of the bigger features coming your way.

Using Qt Quick within Qt 3D

A very common request that we have had since we first released Qt 3D is to have the ability to embed Qt Quick scenes within a Qt 3D application. The use cases for this are wide ranging, but a typical example is to place a 2D user interface onto the surface of some planar piece of geometry in your 3D world to simulate an “in-3D-universe-control-panel”. As VR/AR become more popular, this use case is likely to increase in importance.

I’m happy to say that embedding Qt Quick into a Qt 3D scene is now easily possible. Even better, it is possible to interact with such 2D UIs within the 3D world! The Scene2D QML Example shows how to use the new Scene2D type to render Qt Quick to a texture, apply it to a 3D object, and ensure that events are forwarded to the QQuickItems to allow interactivity.

scene2d


In short, we can render a Qt Quick 2 scene into a texture with Scene2D and register it to receive events from a Qt 3D entity called “cube”:

Scene2D {
    id: qmlTexture
    output: RenderTargetOutput {
        attachmentPoint: RenderTargetOutput.Color0
        texture: Texture2D { id: offscreenTexture }
    }
    
    entities: [ cube ]
    
    Item {
        id: customQtQuickStuff
    }
}

This takes care of rendering the texture. Using it on an Entity is simply a case of applying the resulting texture which can be done with the TextureMaterial:

Entity {
    id: cube

    components: [cubeTransform, cubeMaterial, cubeMesh, cubePicker]

    property real rotationAngle: 0

    Transform {
        id: cubeTransform
        translation: Qt.vector3d(2, 0, 10)
        scale3D: Qt.vector3d(1, 4, 1)
        rotation: fromAxisAndAngle(Qt.vector3d(0,1,0), cube.rotationAngle)
    }

    CuboidMesh {
        id: cubeMesh
    }
    
    TextureMaterial {
        id: cubeMaterial
        texture: offscreenTexture
    }
    
    ObjectPicker {...}
}

The ObjectPicker in the above code is picked up by the Scene2D’s “entities” property and used as a source for events.

The counterpart to Scene2D is Scene3D which allows embedding a Qt 3D scene inside of a Qt Quick 2D UI. Hopefully, in the future, we will be able to get a seamless blend between Qt Quick and Qt 3D.

Physics Based Rendering

Modern rendering engines have largely adopted Physics Based Rendering (PBR) to improve the visual appearance of their results and to make it easier for artists to get predictable results. PBR encompasses a family of techniques but essentially says that rendering should be more physically rigorous when shading than older ad hoc lighting models. For more information and background on PBR please take a look at this talk from Qt Con 2016.

pbr-metal-rough powerup-qt3d-pbr

New to Qt 3D in Qt 5.9 are two new materials: QMetalRoughMaterial and QTexturedMetalRoughMaterial which implement a PBR algorithm with Blinn-Phong specular highlights. There is also a new light type QEnvironmentLight that can be used in conjunction with the above materials to provide nice environmental reflections and image based lighting (IBL) as shown below.

The source code for the above examples are available at KDAB’s github.

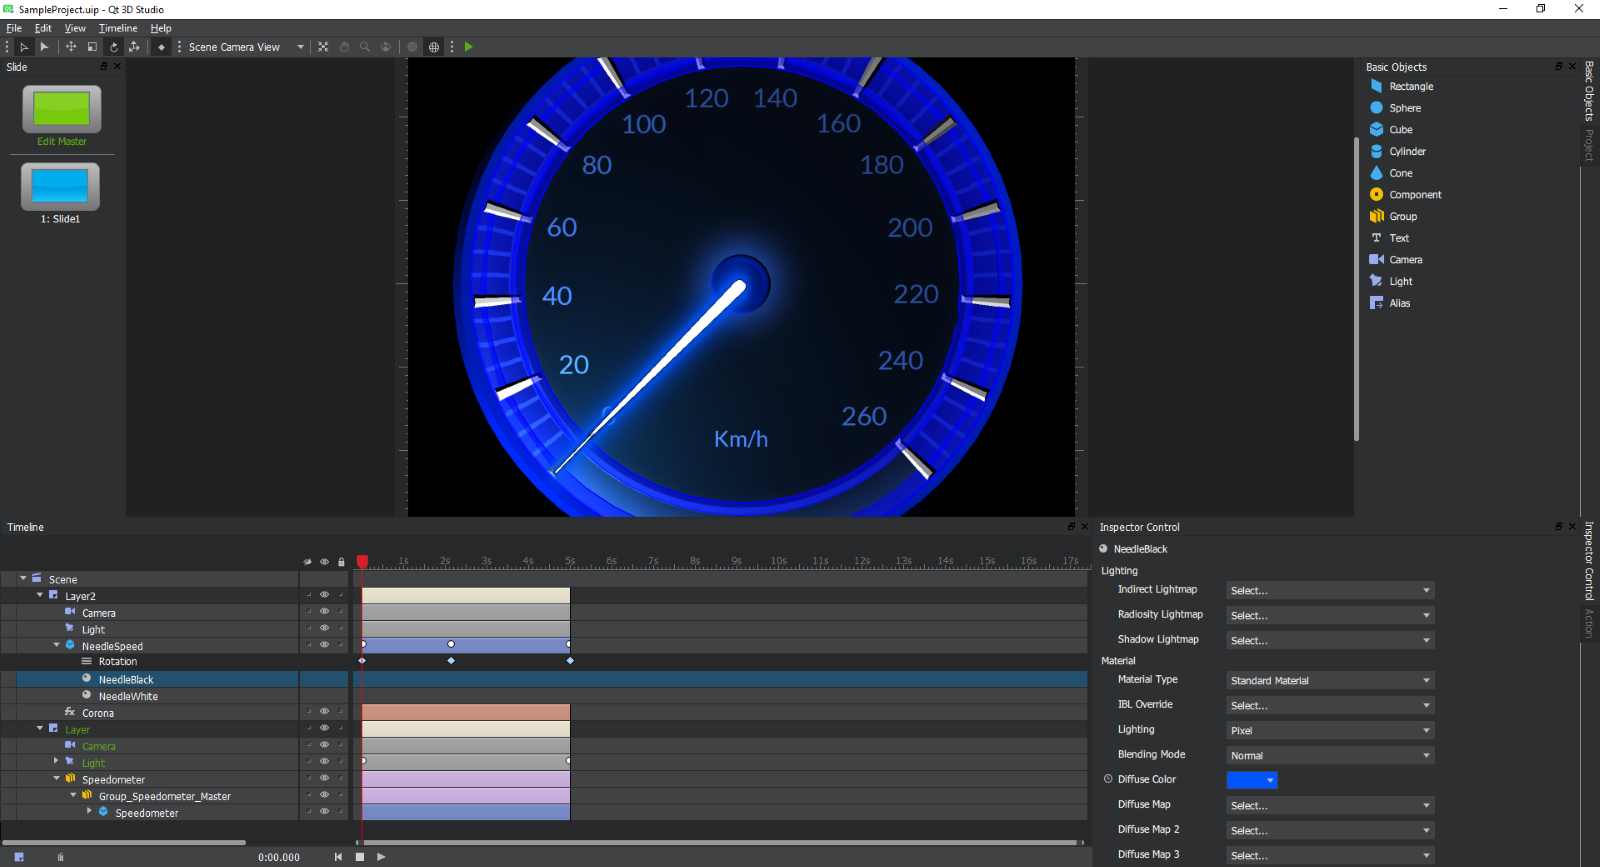
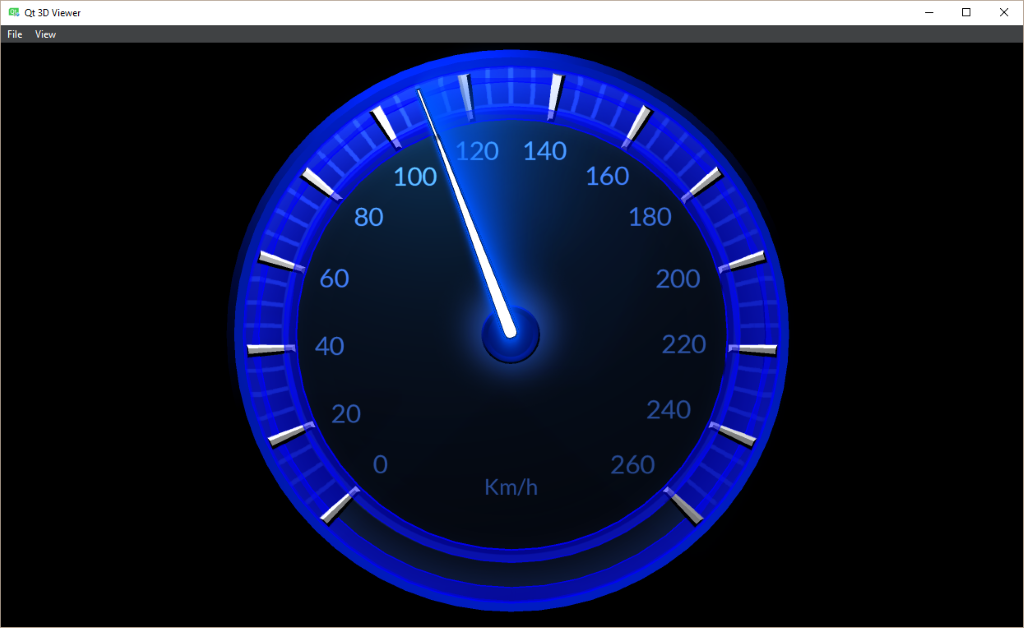
Key Frame Animations

Qt Quick has long had support for easily specifying animations using an intuitive API. This can be used along with Qt 3D to animate properties. A frequent request from digital content creators is for support of key frame animations. Also, given the highly threaded architecture of Qt 3D, it would be nice if we could find a way to improve how animations scale compared to having them evaluated by the main thread. The technology preview of the new Qt3D Animation module achieves exactly this.

Whereas the Qt Quick animation API (and the QPropertyAnimation API in C++) specify an animation curve between the start and end times, when using key frame animations we instead specify the property values at specific times known as key frames. To evaluate the animation at times that do not exactly correspond to key frames we use interpolation/extrapolation. For now, Qt 3D Animation implements a Bezier curve interpolation, but we will expand this with other types for Qt 5.10. However, with the key frames being Bezier curve control points, it is already possible to achieve a wide range of animation curves.

The animation curves are specified using QAbstractAnimationClip which boils down doing it programmatically with QAnimationClip or loading baked animation data exported from a digital content creation (DCC) tool with QAnimationClipLoader. Qt 3D provides a handy addon for Blender to export the animation data of objects into the json format consumed by Qt 3D.

bezier-animation-curves


The actual playback of animation data is handled by a new QComponent subclass called QClipAnimator. As with all other QComponents, the clip animator must be aggregated by an entity to give behaviour to the entity. In addition to the raw animation data, the clip animator also needs a way to specify which properties of which target objects should be updated by the animation. This is done with the QChannelMapper and QChannelMapping classes. Please take a look at this blog post showing a simple application that animates a character using the Qt 3D Animation framework. The source code for this can be found at KDAB’s github.

Entity {
    id: cube

    components: [
        Transform { id: cubeTransform },
        Mesh { source: "qrc:/assets/egg/egg.obj" },
        TexturedMetalRoughMaterial { ... },
        ObjectPicker { onClicked: animator.running = true },
        ClipAnimator {
            id: animator
            loops: 3
            clip: AnimationClipLoader { source: "qrc:/jumpinganimation.json" }
            channelMapper: ChannelMapper {
                mappings: [
                    ChannelMapping { channelName: "Location"; target: cubeTransform; property: "translation" },
                    ChannelMapping { channelName: "Rotation"; target: cubeTransform; property: "rotation" },
                    ChannelMapping { channelName: "Scale"; target: cubeTransform; property: "scale3D" }
                ]
            }
        }
    ]
}

The clip animator, animation data, and channel mapper types represent different concepts which are all merged in the familiar Qt Quick and QPropertyAnimation APIs. Separating these out allows us more control and reuse of the individual parts but we will look at adding some convenience API on top for common use cases.

The QClipAnimator class simply plays back a single animation clip. But what if we wish to combine multiple animation clips? We could drop down a level and craft some new animation data that combines the clips but that’s tedious, error prone and doesn’t work well when changing how we combine the clips at a high frequency. Enter QBlendedClipAnimator. Instead of a single animation clip, the API of a blended clip animator takes a pointer to the root of an animation blend tree – a data structure describing how an arbitrary number of animation clips can be blended together. The blend tree consists of leaf nodes representing animation clips and interior nodes representing blending operations such as linear interpolation or additive blending. For more information on blend trees, please take a look at the Qt 3D Overview documentation.

In order to have performance that scales, the Qt 3D Animation framework evaluates the animation curves on the thread pool utilised by the Qt 3D backend. This allows us to scale across as many CPU cores as are made available. Also, it is often the case that the object tree on the main frontend thread doesn’t need to know or care about the intermediate property updates during an animation. Therefore by default, only the final change from an animation is sent to the frontend objects. If you do need the intermediate values, perhaps because you have property bindings depending upon them, then you can subscribe to them via the new QNode::defaultPropertyTrackingMode. The default behaviour is consistent with the Qt Quick Animator types.

In addition to key frame animations, the Qt 3D Animation module introduces initial support for morph target animations that allow blending mesh geometries between a set of specified target shapes. The blending can be controlled via the above key frame animations. This is likely to be moved into the Qt3D Render module once we flesh out the support a little more.

Level of Detail

When building larger 3D scenes it can be useful to only render the full resolution geometry with high-resolution textures when the object is close enough to the camera to justify it. When the objects are farther away, and the projected screen size is small, it makes sense to use lower fidelity models, textures, and perhaps even shaders to reduce the overall rendering cost and therefore increase performance. Qt 5.9 introduces the QLevelOfDetailand QLevelOfDetailSwitch components to enable this.

The QLevelOfDetail component allows you to set an array of the camera to object distance thresholds or projected screen pixel sizes. As these thresholds are reached, the component adjusts its currentIndex property to match that of the corresponding threshold. You can bind to this property (or connect to its notification signal) to do whatever you like in response. For example, use a loader to load a different mesh, set smaller textures, use a simpler material or shader. It’s up to you.

Entity {
    components: [
        CylinderMesh {
            radius: 1
            length: 3
            rings: 2
            slices: sliceValues[lod.currentIndex]
            property var sliceValues: [20, 10, 6, 4]
        },
        Transform {
            rotation: fromAxisAndAngle(Qt.vector3d(1, 0, 0), 45)
        },
        PhongMaterial {
            diffuse: "lightgreen"
        },
        LevelOfDetail {
            id: lod
            camera: camera
            thresholds: [1000, 600, 300, 180]
            thresholdType: LevelOfDetail.ProjectedScreenPixelSizeThreshold
            volumeOverride: lod.createBoundingSphere(Qt.vector3d(0, 0, 0), 2.0)
        }
    ]
}

The QLevelOfDetailSwitch component works in a similar way but implements a common use case where the children of the Entity upon which it is aggregated are all disabled except for the one matching the currentIndex property. This allows you to quickly and easily get a level of detail system into your application.

Entity {
    components: [
        LevelOfDetailSwitch {
            camera: camera
            thresholds: [20, 35, 50]
            thresholdType: LevelOfDetail.DistanceToCameraThreshold
        }
    ]

    HighDetailEntity { enabled: false }
    MediumDetailEntity { enabled: false }
    LowDetailEntity { enabled: false }
}

For the QML users, there is also a LevelOfDetailLoader which, as its name suggests, dynamically loads custom QML components as the level of detail thresholds are reached.

LevelOfDetailLoader {
    id: lodLoader
    camera: camera
    thresholds: [20, 35, 50]
    thresholdType: LevelOfDetail.DistanceToCameraThreshold
    volumeOverride: lodLoader.createBoundingSphere(Qt.vector3d(0, 0, 0), -1)
    sources: ["qrc:/HighDetailEntity.qml", "qrc:/MediumDetailEntity.qml", "qrc:/LowDetailEntity.qml"]
}

Text Support

Although we have support for embedding Qt 3D within Qt Quick and vice versa, it is still nice to be able to directly use textual content within your 3D virtual worlds. Qt 5.9 introduces 2 ways to do this (beyond Scene2D).

First, there is 2D planar text implemented with distance fields just like the default text rendering in Qt Quick. This is done by way of the QText2DEntity

Text2DEntity {
    id: text
    text: "Hello World"
    width: 20
    height: 10
}

This can be positioned freely in 3D space just like any other entity, and so this becomes a first class citizen of your 3D world.

For those of you that want solid, extruded, 3-dimensional text, there is the QExtrudedTextGeometry class. Or for even more convenience, there is the analogous QExtrudedTextMesh which is a subclass of the QGeometryRenderer component and can, therefore, be directly aggregated by an entity.

auto *text = new Qt3DCore::QEntity(root);

auto *textTransform = new Qt3DCore::QTransform();

auto *textMesh = new Qt3DExtras::QExtrudedTextMesh();
textMesh->setDepth(.45f);
QFont font(family, 32, -1, false);
textMesh->setFont(font);
textMesh->setText(QString(family));

auto *textMaterial = new Qt3DExtras::QPhongMaterial(root);
textMaterial->setDiffuse(QColor(111, 150, 255));

text->addComponent(textTransform);
text->addComponent(textMesh);
text->addComponent(textMaterial);

3d-text

If you need any other kinds of text support in Qt 3D please let us know.

Summary

I hope that this has given you a good overview of the new features coming to Qt 3D with Qt 5.9. We think that you will find them useful in building ever more ambitious 3D projects with Qt. We have even more surprises in the pipeline for Qt 5.10 so watch this space.

The post What’s new in Qt 3D with Qt 5.9? appeared first on Qt Blog.


Device detection in Qt for Device Creation 5.9

$
0
0

Qt for Device Creation provides ready disk images for a variety of devices. When you flash it to a device, start enterprise Qt Creator and plug the device in via USB, it will be detected automatically. You are ready to run, debug and profile your applications right on the device. From a user’s point of view the green marker for a ready device just appears.

ready-device

But how do we actually see the device? There have been changes here for 5.9 and in this post I’ll discuss what we ended up doing and why.

How things used to be

Previous versions of Qt for Device Creation use Android Debug Bridge (ADB) for the device discovery. As you can guess from the name, it’s the same component that is used in the development of Android applications. It was a natural choice early in the development of the Boot2Qt when Android was a supported platform along with embedded Linux. But nowadays we focus on embedded Linux only. (In Device Creation with the device images, Qt can of course still be used to build applications on Android.)

Due to requiring Google’s USB drivers, ADB has made installing more complicated than desired for our users on Windows. And when they jumped through the hoops, they could end up with a different version than we tested against. There’s also the risk of mixups with Android development environments, who may include their own versions of ADB. There were also some things missing, which required working around inside our Qt Creator integration.

Recognizing USB devices

So to avoid those issues we decided to decided to write our own debug bridge, which we without extraneous imagination called QDB. It looks for Boot2Qt devices in a similar way as the purpose of other USB devices is discovered. When a device is enumerated in the universal serial bus, it describes its class, subclass and protocol. For example for my mouse the command lsusb -v reveals:

      bInterfaceClass         3 Human Interface Device
      bInterfaceSubClass      1 Boot Interface Subclass
      bInterfaceProtocol      2 Mouse

There is a vendor-defined class 255. We have picked a subclass and protocol inside that which our devices use, thus allowing QDB to find them. Finding them is of course not enough, since there needs to a way to transfer data between the host computer and the device.

Network over USB

ADB implements file transfers and port forwards. It transfers the data over the USB connection using its own protocol. One obvious option would have been to do the same thing. That would have been reinventing the wheel, as was quickly pointed out by many. There was also a second place where duplication of effort to accomplish the same thing was happening. The Boot2Qt plugin for Qt Creator was implementing support for running, debugging and profiling applications with ADB. But Qt Creator also supports these things with any Linux device over SSH through the RemoteLinux plugin. If we were able to use SSH, all of that duplication could be gotten rid of (after the support window for older Qt for Device Creation releases runs out).

Linux allows a device to present itself as an USB Ethernet adapter with the kernel module usb_f_rndis. The device then shows up as a network card in both Linux and Windows. This way we can have a network connection between the host computer and the device, which allows the use of SSH and thus the desired reuse. And apart from Qt Creator activity, the user can also use regular SSH to connect to the device. It has a properly resizing terminal, unlike adb shell! All the other things you might do over the network also become possible, even if the embedded device has no Ethernet socket.

But there’s something we glossed over. Networks don’t configure themselves. If the user would need to set the right IP address and subnet mask on both the computer and the device, then we certainly wouldn’t meet the bar of just plugging in the device and being ready to go.

Configuring the network

Now despite what I just said there actually are efforts for networks to configure themselves. Under the umbrella term zeroconf there are two things of interest in particular: link-local IPv4 addresses as specified in RFC 3927 and mDNS/DNS-SD, which allows finding out the addresses of devices in the network. For a while we tried to use these to accomplish the configuration of the network. However, getting the host computer to actually use link-local addresses for our network adapter proved fiddly and even if it worked there was a bit too long delay. The connection only works after both the host computer and device have gotten their IP which wasn’t predictable. I hope we will be able to revisit mDNS/DNS-SD at some point, because it might allow us to provide device discovery when devices are connected over Ethernet instead of USB, but for now zeroconf required too much configuration.

Another thing which we looked at was using IPv6 link-local addresses. Unlike their IPv4 cousin they are part of the protocol and always available, which would eliminate the delays and configuration burden. Here the downside is that they are a bit more local to the link. An IPv4 link-local IP is from the block 169.254.0.0/16 and you can just connect to it regularly. IPv6 versions use the prefix fe80::/10, but they also require a “scope ID” to describe the network adapter to use. I’d rather not write

ssh user@fe80::2864:3dff:fe98:9b3a%enp0s20f0u4u4u3

That’s superficial, but there was also a more important issue: All the tools would need to support IPv6 addresses and giving these scope IDs. GDB – which we use for debugging – didn’t.

Back to the drawing board. The simplest approach would be picking up a fixed IP address for the devices. That has two issues. First, you can’t connect more than one device. Second, the fixed IP address might already be in use on the host computer. We ended up using the following approach to circumvent these problems: The same process that recognizes the USB devices knows a list of candidate network configurations in the private use IPv4 ranges. When a new device is connected, it looks at the networks the host computer currently has and then picks a candidate that doesn’t conflict. The device is told the configuration, sets its own IP address accordingly and then acts as a DHCP server that provides an IP for the host computer.

After this process is done, the host computer and device have matching network configurations, Qt Creator knows the IP of the device and everything is ready. If you connect a second device, a different candidate configuration is picked, since the first one is already in use. The DHCP server is disabled when the device is disconnected, because otherwise host computer could get an IP from a previous configuration when it is connected again.

The post Device detection in Qt for Device Creation 5.9 appeared first on Qt Blog.

Multiple UI processes with Qt Wayland – A summary

$
0
0

Creating multi-process UIs is a requirement for a broad range of systems across many industries, and there are a variety of use cases available. Everything from fully leveraging your hardware in a digital automotive cockpit — unifying the user experience across all screens on a single SoC, through to separating out critical safety features in medical devices and ensuring safe third-party updates for set-top boxes and digital TVs. Qt Wayland helps you create multi-process user interfaces which support complex architectures.

Recently, we have put a lot of effort into Qt Wayland and the purpose of this blog is to provide a summary of all the content pieces that have been created in recent times. We hope this may entice your interest to add a window compositing system in your next project.

Multi-screen demo for Automotive

At Embedded World 2017 one of our showcases was a multi-screen demo featuring a digital instrument cluster and infotainment system (IVI). To create the multi-process architecture, it uses the application manager based on Qt Wayland in the Qt Automotive Suite. This demo gives you a good idea of how a system with multiple UI processes can look.

Qt Wayland for Agriculture with CLAAS E-Systems

CLAAS E-Systems, part of the CLAAS Group, which is one of the leading manufacturers of harvesters and tractors, quickly adopted Qt Wayland. We have been in contact with Andreas Cord-Landwehr from CLAAS, who stressed that the complexity for automotive was nothing compared to the complexity that he experiences within the field of agriculture. He was more than willing to write a blog to tell his story of how Qt Wayland allowed them to improve their UIs and UX for their machinery. Read the blog to learn more about his experiences with Qt Wayland. 

Creating devices with multiple UI processes using Wayland

One of our main developers for Qt Wayland, Johan Helsing, wrote a blog post in conjunction with our release of the Qt Wayland Compositor API in 5.8, where he explained some of the benefits of creating multi-process user interfaces, as well as why and how it can support your project. He also created a video tutorial on how to create a compositor. Read the blog and watch the tutorial and also check out his on-demand webinar — Creating Devices with multiple UI processes.

Qt from git on the Tinkerboard (with Wayland)

Laszlo Agocs, one of our senior software engineers, conducted a test using an Asus Tinkerboard and set up the latest Qt base and qtdeclarative from the dev branch and tested out Qt Wayland for window compositing. Read more about the project and the results.

There are also more blog posts on this topic available. Contact us if you need support or consulting on how to get started.

The post Multiple UI processes with Qt Wayland – A summary appeared first on Qt Blog.

Performance Improvements with Qt 5.9 LTS

$
0
0

Qt 5.9 LTS improves Qt Quick and QML performance significantly, especially with Linux on ARM. We have worked hard to improve the performance in multiple areas: within the QML engine, Qt Quick graphics, QML Compiler and in the Qt Quick Controls, to name some examples. Performance has improved significantly across all areas, with some items being several times faster than with our previous long-term supported release Qt 5.6 LTS.

We are regularly running several different kinds of performance tests to see how the various optimizations work across different platforms. Some of these results are visible at testsresults.qt.io, while some tests have not been automated yet. Whenever possible, we are aiming to optimize the performance of all supported operating systems and CPU architectures. For readability and because Linux on ARM has been an area of particular focus with Qt 5.9 LTS, it is the one discussed in this post. Typically, the other platforms have received roughly similar improvements.

Qt Quick Application Startup Time

Startup time of a Qt Quick application is often critical in the embedded space. This is true for small single-process embedded systems, as well as for more complex multi-process devices. We have offered a commercial-only tool called the Qt Quick Compiler since Qt 5.3 to improve the startup time by leveraging the C++ compiler to compile QML into a normal C++ binary. Between Qt 5.6 LTS and Qt 5.9 LTS, the performance of the QML engine has improved with each new Qt release, resulting in improved application startup time. Qt 5.8 introduced QML caching, which makes second and subsequent runs of the applications to be faster. Qt 5.9 also offers a possibility to pre-populate the cache to reach improved performance already with the first run. With the Qt Quick Compiler, the first run is also already fast.

qtquickcompilercomparison

Each application has unique characteristics so the exact benefit in startup time for using Qt 5.9 LTS and/or the Qt Quick Compiler will vary. Typically, the more QML used, the bigger the improvement is. In Qt 5.9 LTS we offer two alternative options: the commercial-only Qt Quick Compiler and a new tool to populate the cache ahead-of-time, which is available for both open-source and commercial users. The performance and reduced startup time are in practice the same with both approaches in Qt 5.9 LTS.

When comparing the startup time for the same Qt Quick application with Qt 5.6 LTS without the Qt Quick Compiler to the startup time of Qt 5.9 LTS using the Qt Quick Compiler (or populated cache), the improvement is a whopping 60% on NXP i.MX6. When using the commercial-only Qt Quick Compiler of Qt 5.6 LTS the improvement in startup time is 54% (compared to Qt 5.6 LTS without the Qt Quick Compiler in use). Comparing the startup times of Qt 5.6 LTS and Qt 5.9 LTS when both are using the Qt Quick Compiler the improvement is 14% on NXP i.MX6.

The application used for the tests was the Qt Quick Controls 1 gallery and the tests were run with Linux on NXP i.MX6 and NVIDIA Tegra X1. We used the Controls 1 example because they are much heavier than Controls 2, thus better resembling a typical real-life Qt Quick application. For more measurements of Qt Quick application startup times, please check out the earlier blog post. For instructions to further optimize startup time of a Qt Quick application, please read the second post of our earlier fastboot blog series.

Qt Quick Controls Performance 

Qt 5.6 LTS features Qt Quick Controls 1 while Qt 5.9 LTS features the Qt Quick Controls 2 fully supported. The main design principle of Qt Quick Controls 2 has been performance, as can be seen already from the blog post announcing them. From the very beginning, the key focus area of the new Qt Quick Controls 2 has been for embedded devices and systems. However, these can equally well be used on all supported platforms. Compared to Qt Widgets or Qt Quick Controls 1, the key difference of Qt Quick Controls 2 is that they do not adapt to platform style. We do offer multiple different styles for Qt Quick Controls 2 and it is easy to make your own style as well. From an architectural viewpoint, the key difference of Qt Quick Controls 2 is that they leverage C++ for everything that can be done with C++ and offer just the QML API for applications to use.

qtquickcontrolscomparison

As illustrated in the graph above, the performance improvement is huge (note: the higher the bar, the better the performance is). We used NXP i.MX6 running Linux for the measurements. For some of the controls the performance is 14x better than before, and on average the performance has been improved 6x comparing Qt 5.9 LTS with Qt Quick Controls 2 to Qt 5.6 LTS with Qt Quick Controls 1. To benefit from the improved performance, the application needs to be ported to use Qt Quick Controls 2. This is typically quite straightforward and Qt Quick Controls 2 offers most of the common controls. Before porting, please check the documentation, as some controls, such as TableView, are not currently available with Qt Quick Controls 2.

Shader Cache 

Qt 5.9 LTS introduces a new feature to cache OpenGL shaders to disk after the first run, as explained in the blog post introducing the shader cache. If your Qt Quick application is using OpenGL shaders, which is quite often the case, it will achieve a significant improvement in startup time compared to earlier versions of Qt. When comparing the performance of Qt 5.6 LTS to Qt 5.9 LTS using the same Qt Quick application with 10 shaders, we can see a significant improvement in the initialization time of the shaders. Some of the performance improvement observed in the measurement is due to the overall improvements in the graphics performance, but most of the improvement can be attributed to the new shader cache feature.

shadercachecomparison

Qt 5.9 LTS is a whopping 7x faster than Qt 5.6 LTS on startup with the same exact Qt Quick application running the same hardware. Just like the previous measurements described in the blog post, this test has also been conducted using NXP i.MX6 running Linux. The performance improvement is dependent on the hardware and especially the GPU plays a major role. Based on our measurements there are significant improvements with every piece of hardware we have tested – including ones that implement cache feature already in the OpenGL driver.

Memory Footprint Improvements

In Qt 5.8 we introduced a new configuration system and made other improvements to reduce the binary size of the Qt framework libraries used for different applications. This was developed as part of the Qt Lite project, which focused specifically on reducing the application size. With Qt 5.9 LTS we have further polished and tuned the available configurations so that more and more different kinds of applications can reach their minimal Qt configuration. Reducing the size of a Qt 5.6 LTS application is possible mainly by just using the modules needed by the application and statically linking the binary. Because of dependencies within the Qt framework, the linker is not able to reach as small binary size as it is possible with Qt 5.9 LTS using the new configuration tool.

qtlitecomparison

We used a simple, but non-trivial, Qt Quick application (samegame) to compare the needed binary size of the application itself as well as all the Qt libraries it needs. With Qt 5.6 LTS the application requires 24,5MB when linking dynamically. Using static linking, the size is reduced to 13,8MB (still using Qt 5.6 LTS). Leveraging the new configuration tool in Qt 5.9 LTS and with other Qt Lite improvements, the exact same application only needs 5,4MB when static linking is used. Percentage-wise, the Qt 5.9 LTS binary size of the application is 61% smaller than the same application with Qt 5.6 LTS and static linking – without losing any functionality or making any changes to the application.

Improvement in JavaScript Performance 

With the improvements in the QML engine in Qt 5.9 LTS the performance of JavaScript execution has also improved. If the Qt Quick application leverages JavaScript, there is a huge improvement in performance compared to Qt 5.6 LTS, especially on 64-bit ARM. One example of heavily leveraging JavaScript is using three.js on top of Canvas 3D, and smaller amounts of JavaScript are often used in Qt Quick applications.

javascriptcomparison

The measurements are done with v8-bench, which can be found in the qtdeclarative repository. Additional measurements are available at testresults.qt.io. With the v8-bench performance benchmark results of Qt 5.6 LTS compared to Qt 5.9 LTS, the improvement on 32-bit ARM is 16%, but on 64-bit ARM the improvement is a whopping 302% (i.e. 4x improvement). The reasons for the huge improvements are that Qt 5.9 LTS fully supports 64-bit ARM processors combined with the improvements in the QML engine.

Overall Qt Quick Performance Improvements 

The examples above are just some of the highlights from many improvements we have done to the performance of Qt Quick in Qt 5.9 LTS. We have tuned multiple individual areas and optimized the execution paths within the Qt framework. It is important to note that we have also worked hard not to regress in any areas. To avoid regressions, we are regularly running a comprehensive Qt Quick benchmark suite called Qmlbench. With the Qmlbench tool we can see the performance of the most commonly used Qt Quick functionality as well as the functionality that is used less frequently. For more details, please review the thorough explanation of how we are using Qmlbench to avoid regressions.

qmlbench_example

When comparing Qt 5.6 LTS and Qt 5.9 LTS in the same environment with the comprehensive Qmlbench measurements, we can see  that some areas improved up to 130% as shown in the graph above. Especially layout and complex text performance has improved drastically. The average improvement of Qt 5.9 LTS compared to Qt 5.6 LTS in all Qmlbench tests is 14% (measured on Linux). Despite which functionality is used, the improvement in performance of a Qt Quick application running Qt 5.9 LTS compared to Qt 5.6 LTS is clear and tangible for most applications.

Conclusions

In this blog post, I summarized some of the multiple performance improvements available with Qt 5.9 LTS. Compared to Qt 5.6 LTS, the performance of the same application running on Qt 5.9 LTS is significantly higher. Without making any changes to the application, except for compiling it for the new Qt 5.9 LTS, the performance is significantly improved. Ranging from improved application startup time and smaller footprint through to increased graphics performance, Qt 5.9 LTS is a major step forward performance-wise. Taking some of the new features, such as Qt Quick Controls 2, into use even furthers the performance improvements available with Qt 5.9 LTS.

Interested in taking a closer look? Qt 5.9.0 has been released today. You can get it with your online installer, from the Qt Account or from the Qt Downloads page (for open-source users).

For more details of Qt 5.9 LTS, please check the Qt 5.9 LTS release blog post.


The post Performance Improvements with Qt 5.9 LTS appeared first on Qt Blog.

QML vs. HTML5

$
0
0

Guest post by Stefan Larndorfer at sequality

Mobile devices have set the standard in terms of responsiveness and user-friendliness for HMIs across industries. Manufacturers of cars, medical equipment, industrial automation systems and consumer electronics now want to replicate this great user experience for their embedded devices. To find out which technology strategy we should select we set up a test where one of our developers was allocated 160 hours to create a demo application of an embedded system using Qt & QML and same number of hours to create the very equivalent application using HTML5.

Over the past year, more and more customers have been asking us at sequality if they should use HTML5 or Qt using the QML declarative UI language to develop software for embedded devices.

In order to give the most objective advice to our customers, we decided set up a test: give the same developer 160 hours to create a demo of an embedded system using Qt and 160 hours to create the demo using HTML5. These demos would show exactly how the two technologies compare – in terms of development, performance, and sustainability – when used to create the same product. The developer tasked with creating the demos was experienced with using HMTL5 and C++, but had little experience creating user interfaces using Qt and QML. The demos were created independently without any vendor input.

QML vs. HTML 5 test results

The demos showed that although the same amount of development time was spent on both versions, implementation with Qt QML delivered a more functional and complete user interface than the HTML5 version. The testing and debugging process was found to be more straightforward with Qt QML, not least because it didn’t need testing on multiple browsers. In general, the Qt QML version responded more quickly and enabled features, like keyboard and multi-touch, that were not supported by HTML5 without additional implementation.

From an end-user perspective, the Qt QML version behaved exactly as expected regardless of the browser or screen being used to view it.

This is because Qt based applications are compiled for the target, meaning that in terms of user observation, they behave exactly the same no matter which platform they run on. HTML5-based applications, on the other hand, run on the browser of the target, for example Chrome, meaning different platforms can show different behavior as the browser might use different rendering engines depending on the platform.

In terms of the sustainability of the technology, Qt QML is a mature technology that has been developed to ensure backwards compatibility. The AngularJS framework for HTML5 is relatively new, and a valid concern is whether it will be replaced by a new framework in the future. In contrast, QML is very likely to still be supported in 5 years.

Overall, Sequality found that the development of the applications was very different and one needs to carefully consider the benefits and drawbacks of each technology before deciding which one to use.

If the outcome of such an evaluation does not show major advantages of a particular technology, we would recommend Qt over HTML5. In our showcase, the Qt based application was generally faster, more responsive, and easier to implement.

Want to know more?

Download the complete white paper

Visit us at our booth at Qt World Summit 2017.


About

Stefan Larndofer is the CEO and Founder of sequality software engineering. Sequality provides high-quality software engineering services, specializing in user interaction (graphical user interfaces, touch screen software, C++/Qt, embedded Linux) technology. Sequality delivers software with a great user experience, inspired by mobile devices. www.sequality.at

The post QML vs. HTML5 appeared first on Qt Blog.

Introducing QtKnx, the smart home library that translates your wishes into KNX protocol.

$
0
0

QtKnx is the first major step to bring home automation at the finger tips of Qt users.
Multi-platform, elegant, flexible and easy to write software for smart homes will now be possible.
All it takes is the new QtKnx library, and the already existing functionalities of Qt.

KNX is the European leader for smart home and building protocol (https://www.knx.org), with its own PC based software for programming and controlling installations. The QtKnx library offers an open source and commercially deployable alternative for this technology.

As a first step, QtKnx can be used to build the KNX client implementation that discovers KNX servers, and then controls and manages the installation behind the server. Let’s have a look on how to do that.

Test case

We are testing the QtKnx functionalities on a small KNX installation, with a board and a server (see picture below). The server is connected to our intranet.

img_20170710_120035197

Discovering

Here is how we can discover this server using the QtKnx library:

  • get a discovery agent object (QKnxNetIpServerDiscoveryAgent agent)

  • set it up (optional)

  • ask the agent to start discovering (agent.start())

  • ask the agent for the list of discovered servers and the services they provide (agent.discoveredServers()).

    QKnxNetIpServerDiscoveryAgent agent;
    //To have the server's response sent only to the provided local IP address as opposed to the multicast one.
    agent.setResponseType(QKnxNetIpServerDiscoveryAgent::ResponseType::Unicast);
    //The local IP address the server's response shall be sent to.
    agent.setLocalAddress(QHostAddress("192.168.1.1"));
    agent.start();
    const auto servers = agent.discoveredServers();
    ...
    for (auto server : servers) {
        const auto serverAddress = server.controlEndpointAddress();
        const auto serverPort = server.controlEndpointPort();
        ...
        const auto serverServices = server.services();
        for (auto it = services.constBegin(); it != services.constEnd(); ++it) {
            qInfo().noquote() << QString::fromLatin1("      KNXnet/IP %1, Version: %2")
                        .arg(familieToString(it.key())).arg(it.value());
                }
    }

In our case, since we are working behind a firewall, only the server connected to the intranet was discovered. Here is what we get back 
using the above piece of code: 

1 server(s) found on the network.
  Server: KNX IP BAOS 777
      Individual address: 1.2.2
      Server control endpoint: 10.9.78.35:3671
    Supported services:
      KNXnet/IP Core, Version: 1
      KNXnet/IP Device Management, Version: 2
      KNXnet/IP Tunnel, Version: 1

Connecting to a KNX installation (e.g. using Tunneling services)

Once the server’s control endpoint address and port are retrieved from the discovery agent, we can establish a connection with the server in order to access the devices behind it. A tunneling connection allows, among other things, the sending of simple packages to, say, turn a light on and off.

To open this tunneling connection:

  • get a tunnel connection object (QKnxNetIpTunnelConnection tunnel)

  • set the local IP address. It will be passed to the server so it knows where to send its responses.

  • connect to the server using the previously discovered server’s control endpoint address and port (tunnel.connectToHost(serverIpAddress, serverPort))

  • use the tunnel to turn a light on and off, sending instructions to the KNX devices behind the server (tunnel.sendTunnelFrame(frame)). The control commands are encapsulated into Cemi frames. Fully automated and explicit frame building functions will be available soon.

  • when we’re done, we disconnect from the server (tunnel.disconnectFromHost())

    const auto servers = agent.discoveredServers();
    QHostAddress serverIpAddress = servers[0].controlEndpointAddress();
    quint16 serverPort = servers[0].controlEndpointPort();
    
    QKnxNetIpTunnelConnection tunnel;
    tunnel.setLocalAddress(QHostAddress("192.168.1.1"));
    // Connecting to the previously discovered server
    tunnel.connectToHost(serverIpAddress, serverPort);
    QKnxCemiFrame frame = ... ;
    tunnel.sendTunnelFrame(frame);
    tunnel.disconnectFromHost();

UI example

Of course, being a part of Qt, inserting QtKnx functionalities into your own UI is painless. Here is how our example UI and the QtCreator environment look like.

screenshot-from-2017-07-06-14-25-49

Brought to you soon: all basic functionalities needed by a KNX client implementation, to easily control and manage the installation, with no prerequisite knowledge of KNX protocol or high level packaging style necessary.

Brought to you later: functionalities to build a KNX server, and be able to program your installation with your own Qt written software.

Did this post raise your interest? In case it did, feel free to get in touch with us to gain access to a pre-release version.

Learn more about our offerings towards the Automation sector here and read our blog post.

The post Introducing QtKnx, the smart home library that translates your wishes into KNX protocol. appeared first on Qt Blog.

Qt for Automation

$
0
0

Hi! As you probably know, our mission has always been to provide the frameworks and tools to help developers focus on what really matters: creating great applications.

Today, Industry 4.0 and the IoT have introduced a whole new set of challenges: There will be more connected devices, which will generate more data, that in turn will lead to even more complex software applications.

This means that the playing field will change at an exponentially accelerating pace, including the state of device infrastructure, application complexity and, last but not least, development. This results in a multi-dimensional challenge in terms of interoperability and scalability. We want to help you turn this challenge into an opportunity with our new Qt for Automation offering.

What “Automation” Means to Us

For us, Automation relates to all connected (edge) devices (clients, gateways and headless devices) and their supporting desktop applications in complex automation environments. Think everything between “smart factories”, “connected service touch points”  to “building automation”. We believe that all these segments face similar challenges from both a technical, as well as a service and business standpoint.

Why “Qt for Automation”?

Qt for Automation not only hands you additional libraries and tools but also includes domain-specific services to overcome industry-specific problems.

This first release of Qt for Automation is just the beginning. We will keep adding improvements and enhancements, which will be included in regular updates throughout the year.

Let’s have a look at the first release.

The Foundation: All the Benefits of Qt 5.9 LTS and More

With Qt for Automation you can get everything you love about Qt 5.9.x LTS, such as the Visual Keyboard, QtSerialbus, VNC,  the Qt Lite Configuration Tool, WebGL Streaming (coming with Qt 5.10) and even Boot2Qt (learn more).

The Qt Lite Configuration Tool lets you cherry-pick the features for your application as opposed to having everything included in a monolithic approach. This allows you to optimize its size, performance and start-up time on any smart device.

New: MQTT – a Future Brick for Connected Devices

Publisher-subscriber protocols have become more and more attractive to automation infrastructures. Message Queuing Telemetry Transport (MQTT) is one of the most prominent candidates for a lot of reasons. By design, it is very lightweight, fulfills high security standards, and guarantees state awareness to all infrastructure members. All those characteristics are very important, as they simplify development and make the solutions built on the protocol both safe and reliable. It has been used in sensors communicating to a broker via satellite link and in a range of home automation and small device scenarios. It is also ideal for IoT applications because of its small size, low power usage, minimized data packets, and efficient distribution of information to one or many receivers.

Our newly-developed MQTT library focuses on the client side only (not the broker) and is fully specification-compliant to protocol level 3.1 and 3.1.1 (prominently known/referred to as 4).

Our MQTT library is part of the Qt for Automation offering but is also available to the public under GPL 3 license conditions.

If you want to learn more about QtMqtt, please have a look at our blog post.

New: KNX – a Worldwide Leader in Building Automation

The KNX foundation with its KNX standard has been a long-time pioneer in standardization and operability between different vendors. It is a worldwide leader in home and building automation, with the most existing deployments . As described by KNX themselves, it is the worldwide standard for applications in home and building control, ranging from lighting and shutter control to various security systems, heating, ventilation, air conditioning, monitoring, alarming, water control, energy management, smart metering as well as household appliances, audio/video and lots more. KNX aims for the most ambitious setups and their standard is ubiquitous and widely supported by manufacturers. However, KNX’s long-standing challenge has been that it is relatively difficult to develop and deploy client applications.

With our new KNX library, we close this gap and make it easier for you to create tailor-made UIs for your smart building and integrate different functionalities (e.g. speech recognition) and technologies (e.g. BLE) in the future. We are bringing the beauty of Qt to KNX so you can switch on a light with just a few lines of code.

The KNX library is part of Qt for Automation offering but is also available to the public under GPL v3 licensing conditions.

If you want to learn more about QtKnx, please have a look at our blog post.

Create Devices, Mobile Apps and Desktop Applications on any Platform

Right from the start, we wanted to offer you something more than just the additional components we ship with Qt for Automation. We know that automation can be handled quite differently depending on the platform used, the individual solutions, the number of shipments, the development pressure and needs to solve development problems.

To address this, we decided to add more value for automation customers:

  • Capability to develop on any platform. We know our customers build devices but we know they also need to develop desktop applications and even mobile apps.
  • Automation consultancy services. We know developers regularly face pressure, but reaching out and finding help takes time. Therefore, we included industry-specific consultancy services to our offering. Just book it, you get it.

More to Come

As already stated, Qt for Automation is just the first release and there are more to come. Over time, we’ll add even more value by extending the existing libraries or tools. We have already identified topics like OPC/UA and AMQP we want to tackle next. To facilitate this development, The Qt Company and its partners have set up a dedicated and growing team :).

Join the Automation Track at QtWS 2017 in Berlin!

We are happy to announce that we’ll feature an Automation track during the QtWS 2017. Join our talks about KNX and MQTT and many more topics presented by us and our partners (e.g. CoAP).

Read and Learn More

Get in Touch with us

Yes, we are happy if you are interested in what Qt has to offer and we love talking about it. Please reach out to us.

The post Qt for Automation appeared first on Qt Blog.

Qt for Device Creation 5.10 Emulator update

$
0
0

controlwindow

The new Emulator 3.0 will address the need to simulate devices with multiple screens. For example, these are present in the dashboards in modern cars.

Multi-screen support

Modern cars have multiple screens on their dashboard. To ease development of applications utilizing multiple screen the emulator has a new multi-screen feature which allows you to emulate devices having multiple screens. In the mockup file, which is now QML based you can declare several displays.

Applications can use one or more screens at the same time.
For every screen your application has to create a separate QQuickView.
for (auto screen : QGuiApplication::screens()) {
auto quickView = new QQuickView();
quickView->setScreen(screen);
quickView->setSource(QUrl("<file.qml>"));
quickView->showFullScreen();
}

Multi-point touch support

Touch and multi-point touch input is supported on all screens. Also the way it works is easier to use.

In multi point touch mode you start by clicking on the screen to add as many touch points as needed.

Starting a left click drag on one of the points will perform a swipe gesture using all of the points while a right click drag will perform a pinch gesture around the average center of all points.

emulator-multiscreen

Plugin Interface

The API for plugins has been simplified. Some parts of the emulator itself are also shipped as plugins as well.
This allows you to provide your own controls in the UI or handle custom communications with a client running inside
the virtual machine.

Mockup is QML

The mockup design done in QML and allows to add sophisticated custom controls more easily. Components like screens and terminals can be handles like regular QML components.

Product information

The Emulator 3.0 is part of Qt for Device Creation within Qt 5.10.

The post Qt for Device Creation 5.10 Emulator update appeared first on Qt Blog.


Towards an Improved Qt 3D Studio Runtime

$
0
0

Now that Qt 3D Studio 1.0 has been released, it is time to have a sneak peek at some of the upcoming developments. As outlined in the release announcement, there is work on-going to move the runtime, meaning the engine that renders and runs the scenes, on top of Qt 3D. Let’s take a closer look at this.

Overview

Scenes and Layers

Qt 3D Studio is a design tool that allows rapid development of 3D scenes, focused on, but not limited to, 3D user interfaces. Once assets like 3D models and texture maps are imported, designers create scenes by placing and transforming 3D models, applying materials, and setting up keyframe-based animations that target properties of the models, materials and layers. The concept of layers map naturally to what one may be familiar with from tools like Photoshop: each layer contains a 3D scene with its own camera. These are then composited together based on their position, size and blending settings, thus forming the final output of the rendering.

On the layer level there are multiple antialiasing techniques available, like multisampling, supersampling, progressive and temporal antialiasing. See the documentation for an overview of these.

Slides

All this is complemented by a slide system, not unlike presentation tools like Powerpoint. A slide could be thought of as a state: it defines the set of active (visible) objects, the property changes that get applied to the various scene objects, and the set of animations that start when entering the slide in question. This is complemented by the concept of the master slide, which allows defining a set of objects and animations that are present on all slides.

Materials

When the default material, that provides pixel-based lighting, directional, point and area lights, shadow mapping, screen space ambient occlusion, image-based lighting and a number of other features, is not sufficient, custom materials can be applied. These provide custom (fragment) shader code together with a set of properties that form the input to the shaders. Such properties are editable and animatable in the editor just like the built-in ones. While many custom materials will contain a single shader, they can also contain multiple ones, thus defining multiple passes that run in order, each of them further processing the results of the previous passes.

Effects

To apply effects on the content of a given layer, post-processing effects can be used. These are similar to custom materials, but take the output of the 3D rendering from a given layer as their input. Conceptually they map to the ShaderEffect items of Qt Quick but are somewhat more powerful.

Sub-presentations

While one presentation (a single .uip file) describes a single scene (albeit with multiple layers, hence it is more like a 2D composition of multiple 3D scenes), it is possible to have multiple presentations loaded and run in parallel. Here one presentation serves as the “main” one, which is the presentation that gets rendered to the screen. The others serve as sub-presentations that are first rendered offscreen, and then used as texture maps in the materials of the main scene. They can also be used as the source for one or more of the layers of the main presentation.

Building on this, Qt 3D Studio also offers interoperation with Qt Quick. This is achieved by the familiar QQuickRenderControl. This means that interactive Qt Quick scenes can be displayed inside the Qt 3D Studio scene.

This list, while already long enough, does not cover everything. See the documentation for more details.

Qt 3D Studio in action

Qt 3D Studio in action

The screenshot shows many of the facilities mentioned above:

  • The slide management pane on the left,
  • the pane on the right that displays either basic objects (that can be dragged into the scene) or the presentation and asset browser (where 3D models and texture maps are dragged and dropped in order to import assets, and then dragged into the scene or the scene browser below),
  • the bottom pane contains the scene browser (note how the example has two layers, each with its own camera, lights and models) and the timeline that is used to define and edit keyframes,
  • the bottom-right pane, showing the properties for the currently selected model, material or other object.

What’s in a Runtime?

The main editor application is complemented by the so-called runtime component, which consists of the C++ and OpenGL-based engine that renders and runs the presentations created with the editor both in the viewer application shipped with Qt 3D Studio and in any other Qt applications. The APIs provided allow integrating Qt 3D Studio scenes into Qt Quick, QWidget and QWindow-based applications, and also provide facilities for rendering completely offscreen in order to generate videos for example. The rendering APIs are complemented by a set of QML and C++ APIs that allow changing properties of the scene objects at runtime and controlling the slide and animation system. See the links to the documentation for more details.

Qt 3D Studio Viewer example

The same scene in the standalone Qt 3D Studio Viewer application

For an impression of what the APIs Qt application developers would use look like, let’s look at the source of two of the included examples. First, a straightforward pure QWindow-based application (can be found under example/studio3d/surfaceviewer):

#include <QtStudio3D/Q3DSSurfaceViewer>
#include <QtStudio3D/Q3DSViewerSettings>
#include <QtStudio3D/Q3DSPresentation>
#include <QtStudio3D/Q3DSSceneElement>
#include <QtStudio3D/Q3DSElement>
...
int main(int argc, char *argv[])
{
    QGuiApplication app(argc, argv);

    QWindow window;

    QSize size(1200, 800);
    window.resize(size);
    window.setSurfaceType(QSurface::OpenGLSurface);
    window.setTitle(QStringLiteral("Qt 3D Studio surface viewer example"));
    window.create();

    QOpenGLContext context;
    context.setFormat(window.format());
    context.create();

    Q3DSSurfaceViewer viewer;
    viewer.presentation()->setSource(QUrl(QStringLiteral("qrc:/presentation/circling_cube.uip")));
    viewer.setUpdateInterval(0);
    viewer.settings()->setScaleMode(Q3DSViewerSettings::ScaleModeFill);
    viewer.settings()->setShowRenderStats(true);

    Q3DSSceneElement sceneElement(viewer.presentation(), QStringLiteral("Scene"));
    Q3DSElement counterElement(viewer.presentation(), QStringLiteral("Scene.Layer.Loopcounter"));

    viewer.initialize(&window, &context);

    window.show();

    int n = 0;
    QString loopCounter = QStringLiteral("Loop %1");
    QObject::connect(&sceneElement, &Q3DSSceneElement::currentSlideIndexChanged, [&]() {
        if (sceneElement.currentSlideIndex() == 1)
            n++;
        counterElement.setAttribute(QStringLiteral("textstring"), loopCounter.arg(n));
    });

    return app.exec();
}

In practice one will likely rather use the Qt Quick integration, at the core of which stands the Studio3D element. Under the hood this is built on QQuickFramebufferObject. (the snippet here is from examples/studio3d/qmldynamickeyframes).

import QtQuick 2.7
import QtStudio3D 1.0

Item {
    ...
    
    Studio3D {
        id: studio3D
        anchors.fill: parent

        // ViewerSettings item is used to specify presentation independent viewer settings.
        ViewerSettings {
            scaleMode: ViewerSettings.ScaleModeFill
            showRenderStats: false
        }

        // Presentation item is used to control the presentation.
        Presentation {
            source: "qrc:/presentation/dyn_key.uip"

            // SceneElement item is used to listen for slide changes of a scene in the presentation.
            // You can also change the slides via its properties.
            SceneElement {
                id: scene
                elementPath: "Scene"
                onCurrentSlideIndexChanged: {
                    console.log("Current slide : " + currentSlideIndex + " ("
                                + currentSlideName + ")");
                }
                onPreviousSlideIndexChanged: {
                    console.log("Previous slide: " + previousSlideIndex + " ("
                                + previousSlideName + ")");
                }
            }

            // Element item is used to change element attributes
            Element {
                id: materialElement
                elementPath: "Scene.Layer.Sphere.Material"
            }

            property int desiredSlideIndex: 1
            property int colorIndex: 0
            property var colorArray: [
                [1.0, 1.0, 1.0],
                [1.0, 0.0, 0.0],
                [0.0, 1.0, 0.0],
                [0.0, 0.0, 1.0],
                [0.0, 1.0, 1.0],
                [1.0, 0.0, 1.0],
                [1.0, 1.0, 0.0]
            ]

            function nextSlide() {
                // Separate desiredSlideIndex variable is used to keep track of the desired slide,
                // because SceneElement's currentSlideIndex property works asynchronously.
                // This way the button click always changes the slide even if you click
                // it twice during the same frame.
                desiredSlideIndex = desiredSlideIndex != 3 ? desiredSlideIndex + 1 : 1;
                scene.currentSlideIndex = desiredSlideIndex
                slideButtonText.text = "Change Slide (" + desiredSlideIndex + ")"
            }

            function resetTime() {
                scene.goToTime(0);
            }

            function changeColor() {
                colorIndex = colorIndex >= colorArray.length - 1 ? colorIndex = 0 : colorIndex + 1;
                materialElement.setAttribute("diffuse.r", colorArray[colorIndex][0]);
                materialElement.setAttribute("diffuse.g", colorArray[colorIndex][1]);
                materialElement.setAttribute("diffuse.b", colorArray[colorIndex][2]);
                changeColorButton.color = Qt.rgba(colorArray[colorIndex][0],
                                                  colorArray[colorIndex][1],
                                                  colorArray[colorIndex][2], 1.0);
            }
        }
        onRunningChanged: console.log("Presentation running")
    }
    ...

(Before anyone asks: The ability to embed the output of the various Qt UI frameworks into each other opens up the possibility for creative recursive solutions indeed. However, while the idea of embedding a Qt Quick scene into a Qt 3D Studio scene embedded again in Qt Quick which then perhaps gets embedded into a plain Qt 3D scene which in turn can be part of another Qt Quick scene, … may sound exciting at first, it is best not to overdo it.)

Of course, the editor application itself also needs to display, edit and have fine-grained control over the scene. In the current iteration (1.0) not everything is unified in this respect, meaning the way the editor renders under the hood is not necessarily based on the same code as in the viewer or in the external applications. Longer term we expect to have a more unified approach in place. For now, let’s focus on the runtime from the perspective of a typical Qt application.

Towards Qt 3D Studio 2.0

You said C++ and OpenGL. Good enough, no?

The 1.0 runtime is pretty portable already and it comes with the necessary Qt integration bits as shown above. However, as it is based on the code inherited from the original NVIDIA contribution with only certain parts Qt-ified, and with a strong dependency to OpenGL, there is room for improvement. Fortunately, it turns out we have a good way forward – while staying fully compatible with presentations created with the already released version 1.0.

Qt 3D 2.0 (not to be confused with the Qt 3D 1.0 project from Qt 4 times) has been introduced to Qt 5 by developers from KDAB. See this post for an introduction. Besides providing the necessary building blocks, like an entity-component system and the concept of framegraphs that turn out to be an excellent tool for describing how to render multi-pass 3D scenes in a data-driver manner, its abstractions become handy also when looking towards the future where graphics APIs other than OpenGL will play an increasingly important role.

Therefore, back in April we started a little experiment under the Dragon3 internal codename to see what it would take to load and run those .uip presentations on top of Qt 3D. The new code base is developed with the familiar Qt style and conventions, thus providing a better, more maintainable, and more future-proof component in the larger Qt ecosystem. This is the project now often referred to as the Qt 3D Studio Runtime 2.0, with a first release due around May 2018 together with Qt 3D Studio 2.0. Like Qt 3D Studio itself, the code is available in public already today, although it does come with a huge disclaimer of being heavily work in progress.

Should I wait then?

Not at all. As mentioned before, compatibility is a priority, so for all practical purposes the 1.0 release is the thing to use. Naturally those who feel like experimenting are welcome to check out the code from the qt3d-runtime repository as well (which needs the dev (eventually 5.11) branch of qtbase and qt3d to build).

Let’s continue in the next post. In the meantime those who cannot wait and are keen on diving into the juicy details can check out my presentation at the Qt World Summit earlier this year.

That’s all for now, happy 3D hacking!

The post Towards an Improved Qt 3D Studio Runtime appeared first on Qt Blog.

Push Messaging for embedded solutions

$
0
0

To fuel growth, Qt’s offering for developers is enhanced with a push notification service by Kaltiot. Developers can focus on their own embedded solutions and take full advantage of the ready-to-use smart connectivity and communication service.

Push messaging is widely used in mobile and web development. For instance, social media services use it to send notifications to mobile phones. Also, Push messaging is essential for industries like automation, automotive and robotics. The need for this functionality is increasing for embedded and IoT devices when more and more messages are pushed by backend service providers, cloud, and other services.

To help accelerate the growth within the automotive, healthcare and IoT sectors, to name a few, Kaltiot is widening its developer support with the Cloud Messaging API, which has been contributed to the Qt framework and is available now as source code through Git.

Developers can now focus on their own embedded solutions and utilize the ready-to-use through the API. The service provides bi-directional, and always online, yet battery optimized communication. By using the Cloud Messaging API, developers can easily create cross-platform applications with Qt and also take advantage of the Kaltiot solution for embedded, mobile and desktop development. The Kaltiot client SDK is designed for automated provisioning and works even in constrained low-end devices in poor wireless network conditions.


The players

Team Kaltiot has developed secure (push) and scalable messaging between devices and services since 2008. The cloud service is trusted by Microsoft among others and their social media partners who transmit notifications to tens of millions of users around the world. Kaltiot Smart IoT is currently available e.g. for Linux32, Linux64, RasberryPi, Mac, Android, and NodeJS. https://kaltiot.com

The post Push Messaging for embedded solutions appeared first on Qt Blog.

Qt Cloud Messaging API Available for Embedded Systems

$
0
0

Challenges with cloud messaging for embedded devices has inspired the Kaltiot & SnowGrains teams to create a cross-platform Qt API which enables easy push messaging from and to embedded devices. The API is called the Qt Cloud Messaging API and it is built with flexibility and extensibility in mind.

We have decided to target other Qt areas, too, and make the API easily extensible to any service provider instead of being for embedded only. This enables developers to use the same API for both mobile and desktop development.

There is a vast number of push messaging providers for mobile and web development nowadays. Yet in industries like automation, automotive, robotics and for other embedded devices there has not really been any providers for this type of service. The need is increasing at a rapid pace as embedded and IoT devices are pushed more and more messages by the device owners, car service providers, telemetry, cloud and many others.

The Qt Cloud Messaging API is simple to adopt and take into use.

Let’s take a sneak peek at how to utilize the API for embedded systems and Android mobile platforms. We’ve integrated the Kaltiot Smart IoT SDK and the Firebase C++ SDK into the backend, and with the Qt Cloud Messaging API we can easily create e.g. a chat application on top of it.

Kaltiot Smart IoT is a service for scalable and secure messaging between devices and services. It provides bi-directional and always online, yet battery optimized communication. The client SDK is designed to work even in constrained low-end devices in poor wireless network conditions. Kaltiot Smart IOT is available for Linux32, Linux64, Raspberry Pi, Mac, Android.

How to use the Qt Cloud Messaging API for embedded devices:

 First, clone the qtcloudmessaging repository: git clone https://codereview.qt-project.org/qt/qtcloudmessaging

Service provider

Pre-requirements:

  1. Get the Kaltiot SDK to your embedded device from (e.g. Linux or Raspberry Pi SDK) https://console.torqhub.io
  2. Get the API key for sending channels or/and creating server-side implementation
  3. Add following line to your application .pro file: QT += cloudmessagingembeddedkaltiot
  4. Define KALTIOT_SDK path to your application.pro
  5. Add following includes to main.cpp
#include <QtCloudMessaging>
#include <QtCloudMessagingEmbeddedKaltiot>
  1. Add following QtCloudMessaging configs to main.cpp
// Instantiate CloudMessaging library
QCloudMessaging *pushServices = new QCloudMessaging();

// Add provider for Kaltiot Embedded systems
QCloudMessagingEmbeddedKaltiotProvider *kaltiotPushService = new QCloudMessagingEmbeddedKaltiotProvider()

// Provider based init parameters are given with QVariantMap
QVariantMap provider_params;

provider_params["API_KEY"] = "Your API key from the Kaltiot console for server communication";
// Creating name for provider which can be used cross your app.

pushServices->registerProvider("KaltiotService", kaltiotPushService, provider_params);

QVariantMap client_params;

client_params["address"] = "IOTSensor1";
client_params["version"] = "1.0";
client_params["customer_id"] = "Kaltiot";

// Creating default channels to listen
QVariantList channels;
channels.append("weather_broadcast_channel");
client_params["channels"] = channels;

// Connect IoT sensor client to system
pushServices->connectClient("KaltiotService", "IOTSensor1", client_params);

//! Automatically subcribe to listen one more channel e.g. WindInfo.
pushServices->subsribeToChannel("WindInfo", " KaltiotService ", " IOTSensor1");
  1. Provide context of cloud messaging to QML in main.cpp
//! Provide context to QML

engine.rootContext()->setContextProperty(“pushServices”, pushServices);

QML Part:

in main.qml catch the messages coming from the Kaltiot service.

  1. Receiving messages
Connections{
target : pushServices
onMessageReceived:{

//! Message is received as string and needs parsing to JSON
console.log(message)
}
}
  1. Sending messages:
//! Sending a broadcast message e.g. from the weather station:
//! Message structure for embedded devices is easy:
//! define payload json:
//! {
//!   “payload_type”:”STRING”,
//!   “payload”: encodeURI(JSON.stringify(payload))
//! }
//! Payload is your application specific. E.g:
var payload =
{
msgType:”NEW_WEATHER_INFO”,
city: “Oulu”,
forecast: “full sunlight for whole next week”
}

//! Capsulate payload to message and send it via QtCloudMessaging API:
var payload_array = [{“payload_type”:”STRING”,”payload”: encodeURI(JSON.stringify(payload))}]

pushServices.sendMessage(JSON.stringify(data), ”KaltiotService”, ”IOTSensor1”, ””, ”weather_broadcast_channel”);

Using the Qt Cloud Messaging API for Android / iOS mobile development with Google Firebase service provider

Pre-requirements:

  1. Create new project into Google Firebase console: https://firebase.google.com/
  2. Download Google Firebase C++ SDK  and add the Firebase configuration file for Android Gradle:
DISTFILES += \android/google-services.json
  1. Add following line to your application .pro file:
QT += cloudmessagingfirebase

Define Google firebase path into your application.pro file with

GOOGLE_FIREBASE_SDK = <Path_to_Firebase_SDK>
  1. Add following includes to your main.cpp
#include <QtCloudMessaging>
#include <QtCloudMessagingFirebase>
  1. Add following QtCloudMessaging setup to main.cpp:
// Instantiate CloudMessaging library
QCloudMessaging *pushServices = new QCloudMessaging();
QCloudMessagingFirebaseProvider *firebaseService = new QCloudMessagingFirebaseProvider();
QVariantMap provider_params;

// Server API key is not recommended to store inside to the application code due security reasons.
// But if you do, make sure it is inside compiled C file or if you are doing a server side implementation with C++ & Qt.
// SERVER_API_KEY Is needed to be able to send topic messages from the client without Firebase application server.

provider_params["SERVER_API_KEY"] = "Get your SERVER API KEY from the google firebase console";

// Registering the Google firebase service component.
pushServices->registerProvider("GoogleFireBase", firebaseService, provider_params);

/*! Connected client is needed for mobile device.
\param Service name "GoogleFireBase"
\param Client identifier name to be used inside the application
\param Parameters for the client. No params for firebase client.
*/
pushServices->connectClient("GoogleFireBase", "MobileClient", QVariantMap());

//! Automatically subscribe to listen one example topic
pushServices->subsribeToChannel("ChatRoom", "GoogleFireBase", "MobileClient");
  1. Provide context of cloud messaging to QML in main.cpp
//! Provide context to QML
engine.rootContext()->setContextProperty(“pushServices”, pushServices);

QML Part:

in main.qml catch the messages coming from the google firebase

  1. Receiving messages
Connections{
target : pushServices
onMessageReceived:{
//! Message is received as string and needs parsing to JSON
console.log(message)
}
}
  1. Sending messages:
//! For firebase, message structure needs to have data as whole message.
//! Notifications are shown in the Android/iOS notification center.
function sendMessage(notification_titile, notification_msg, msg){
var data = { “data”:{
“message”: {“text”:msg } },
“notification” : {
“body” : notification_msg,
“title” : notification_titile
}
}

//! Give data and service provider identifier as well as client name defined in the C++ code.
pushServices.sendMessage(JSON.stringify(data),”GoogleFireBase”,”MobileClient”,””,”ChatRoom”);
}

You can play around with the Qt Cloud Messaging API + firebase from the sample

https://github.com/snowgrains/qtcloudmessaging-examples

The Qt Cloud Messaging API provides cross-platform API to enable us to include new providers and still keep the development API as same.

The Qt Cloud Messaging API has been developed to be easily extensible to any service provider. Take a sneak peek at ongoing development from the https://codereview.qt-project.org/qt/qtcloudmessaging and contribute your own backend service to the community.

Kaltiot has been developing and hosting IoT cloud services since 2008. Trusted e.g. by Microsoft, Kaltiot passes through 10M messages every hour. (www.kaltiot.com)

SnowGrains provides Full Stack Software Solutions On The Rocks.(www.snowgrains.com)

Ari Salmi is multi-technology developer and Qt enthusiast.

The post Qt Cloud Messaging API Available for Embedded Systems appeared first on Qt Blog.

Boost your IoT Device with Qt

$
0
0

Here at guh GmbH, the creators of the IoT platform nymea, we have been using Qt since right from the start. You may think: it seems an odd choice to use Qt for a device with no UI requirements but just middleware components basically invisible to the user. Let me explain why this definitely isn’t the case. Essentially, there are three misconceptions in the previous statement.

nymea1

UI Framework: Yes, but so Much More

The first and biggest misconception is that Qt only focuses on UI projects. It is true that Qt started as a UI toolkit many, many years ago. But since then, Qt has evolved into a fully featured set of libraries and tools supporting the developer in every layer of the stack. Even if you don’t need graphical bells and whistles, Qt will increase your productivity by an order of magnitude. I’ll go a bit more in depth later on.

UI has Many Faces

Now, let me address the second misconception in the above statement: that no display equals no UI. Even when you’re building an embedded device without display, there’s hardly no user interface for it. In our example the user interface consists of a web interface running on the IoT box and a client app. The client application, running on mobile phones, PCs or just wall-mounted displays is mostly a thin UI layer, talking to the device. Here, Qt Quick can deliver a smooth, modern experience with a “write once, run everywhere” application. And the coolest part: since Qt 5.10, this very same client application can be re-used as the web interface on the device deploying the new Qt WebGL features.

No More Overhead: Deploy Only What You Need

Another comment I’ve often heard is that importing Qt into an embedded device would be a huge overhead. While in the early days, Qt was built of some few, rather big modules, this has changed a long time ago. At the very latest with Qt5, the modularization of Qt has facilitated fine-grained control of what parts of Qt are needed for a small footprint installation. However, in recent days this has been taken even further, and with Qt for devices it is now possible to strip down the required components to the real bare minimum, invalidating this point completely.

nymea3

How Qt has Increased Our Productivity Building nymea:

As mentioned above, I’d also like to address some of the features of Qt which have helped increase the productivity of nymea tremendously.
There are too many to list them all here, but the most important ones for our middleware stack are:

  • Plugin architecture: Qt’s plugin architecture is a perfect fit to load plugins, taking away all the complexity of finding and loading libraries. With nymea being built based on plugins, this constitutes a significant advantage. The core of the platform is a piece of software managing configurations and the “smartness” of things. All the actual hardware and online services, so called “things”, are enabled in the system via plugins.
  • Transport protocols: Just a few calls to the Qt APIs are all it takes. nymea’s middleware offers interfaces via sockets (TCP/IP or local sockets), WebSockets, REST and Bluetooth RFCOMM. All of those are simply at hand with Qt, using SSL encryption, providing certificates for secure communication.
  • JSONRPC based API: Qt offers support for JSON and allows easy conversion between internal data structures into JSON objects. This is a huge plus for us since nymea speaks a JSONRPC based protocol when interacting with clients.
  • Testing and debugging framework: Developers enjoy the advantages of a highly abstracted API. nymea’s codebase is studded with autotests using Qt Test. This turns writing test cases into an easy task and facilitates printing test reports and statistics in a variety of common formats (like UnitXML). Additionally, it enables integration with other existing frameworks for testing and debugging like coverty, Valgrind and all the other tools out there, as in the end, for those it’s just good old C++.
  • API documentation using QDoc: Qt offers an amazing documentation on doc.qt.io. QDoc enables doc generation directly out of the code through the CI setup and allows flexible custom styling while still preserving the clean look and feel of Qt docs. For nymea (https://doc.nymea.io/) as a platform which enables third-party developers to add their hardware/service such documentation is obviously essential.
  • A ton of small helpers all along the way: Qt offers an uncountable amount of features coming in handy while developing a headless application. From command-line argument parsing and log output filtering to online connectivity, various IPC mechanisms in the system (e.g. D-Bus) etc. Every feature is just ready to use with minimal effort.
  • All (or pretty much all) of this comes in a completely cross platform manner. While nymea is focused to run on Linux based devices, thanks to Qt it can be built for just about any platform. Of course, some platform integrated features like D-Bus APIs won’t work on all platforms, but those are very rare exceptions. Currently, nymea has a dpkg based repository for all supported Ubuntu and Debian distributions as well as snap packages for snap based systems. The client app is built for desktops and Android targets. Our team is also working on enabling iOS and the WebGL based version to have a fully Qt Quick based web interface for nymea, all out of a single codebase.

The gist of all this: Qt is an ideal framework whether your project includes a UI or not. Its high number of well-tested, high-quality APIs make every developer’s life that much easier, especially as those APIs are super easy to understand. Meanwhile, Qt still allows you to enjoy all the advantages of C++. So as you can see Qt is perfect for IoT.

guh-logo

About nymea: nymea makes your product smart. Fast, plannable, and hassle-free. Our M2M stack guarantees effortless API integrations. We believe in the strength of integrated edge solutions.

Meet us at Embedded World 27th Feb – 1st March 2018. Get your free ticket here: https://www.qt.io/ew-2018

The post Boost your IoT Device with Qt appeared first on Qt Blog.

Medical Device Design & Manufacturing Challenges: 2017 And Beyond

$
0
0

Near the end of 2017, Med Device Online published an article outlining important medical device design and manufacturing challenges at present and would extend into 2018 and beyond.

Working with Qt, and developing on the innovative, safe, and effective Qt software framework, we help companies meet and overcome these challenges medical device developers and manufacturers face.  The following is a list of the challenges outlined in the Med Device Online article and the Qt response:

  • Beating the Competition with Innovation
    You can create modern User Experiences with uncompromising performance & reliability. Build safe, effective, and reliable user interfaces and user experiences on almost any embedded device or mobile device platform.
  • Anticipating Rising Costs & Regulatory Changes
    The Qt Company has a very experienced and diverse partner ecosystem. Leveraging our close relationship with The Emergo Group allows our customers to better understand and anticipate the effects of pending regulations. Through this partnership our customers can best align their product development cycle with the regulatory certification cycle, making their overall go-to-market process (development + regulatory) faster and more efficient.
  • Streamlining R&D Amid Shorter Product Life Cycles
    During a recent customer survey, 84% of Qt’s customers state that their development teams are more productive using Qt. When asked how much productivity increased, their response was that productivity went up nearly 100%, or doubled, what it did when they weren’t using Qt. Qt allows you to do more work with less people in shorter amounts of time. If your software is intended to live on different types of platforms, you will not need a separate software development team for each platform with which it is to be compatible. The User Interfaces and User experiences created on Qt can reside on mostly any embedded or mobile platform with one code base. Simply code and compile to iOS, MacOS, Windows, Android, Embedded Linux, QNX, and many others.
  • A Need For Growing Support Networks
    The Qt Company has a very experienced consultancy group and that can help streamline R&D processes and uncover new, “outside the box” opportunities to compete on innovation. Our Qt consultants combined with our industry leading partnerships help our partners streamline time-to-market while enhancing safety and effectiveness.

We at The Qt Company are happy to help companies to design safe, efficient and user-friendly medical devices. Read more about our offering for the medical industry at www.qt.io/qt-in-medical.

The post Medical Device Design & Manufacturing Challenges: 2017 And Beyond appeared first on Qt Blog.

Viewing all 111 articles
Browse latest View live